8 Wedding Reception Aisle Decorations: That Photographs Like Your Love Looks!


A dramatic wedding reception entrance with the couple walking down a flower-lined aisle illuminated by warm uplighting, with a cascading floral arch visible at the end and soft golden light creating romance and depth

Most couples think about their reception entrance as a moment. A 30-second walk from doorway to dance floor.

But photographers and designers think about it differently: as a scene that lives in your album and memory for decades.

The difference between a forgettable entrance and one your guests talk about for years isn’t more flowers or a more elaborate arch. It’s intentional design that works with light, space, and movement to create an emotional moment.

Your reception entrance is the only moment when all 100+ guests are watching you together, phones down, facing the same direction.

No other moment in your wedding day gets that focus. Everything you design there should serve the emotional story you want to tell in that 30 seconds: Are you dramatic and glamorous? Intimate and romantic? Joyful and playful? The aisle—the flowers, the lighting, the music, the movement through space—is how you tell that story visually.


Gold light falls on white roses,
the air itself seems to glow,
and for a moment
everyone sees the same beautiful thing.


The Short Answer

Design your reception entrance around light first, flowers second. Choose one focal point (arch or backdrop), then light it to draw every eye to that moment.

Use uplighting to define the aisle and create emotional warmth. Add one dramatic lighting effect (fog, projection, or hanging light installation) that feels aligned with your aesthetic, not gimmicky.

Test your design with your photographer before the wedding day—they’ll see light differently than your eyes do and will tell you what actually photographs.

Then let the flowers, fabric, and decor support the light rather than compete with it.

The most beautiful entrances aren’t the ones with the most stuff—they’re the ones where light makes everything glow.


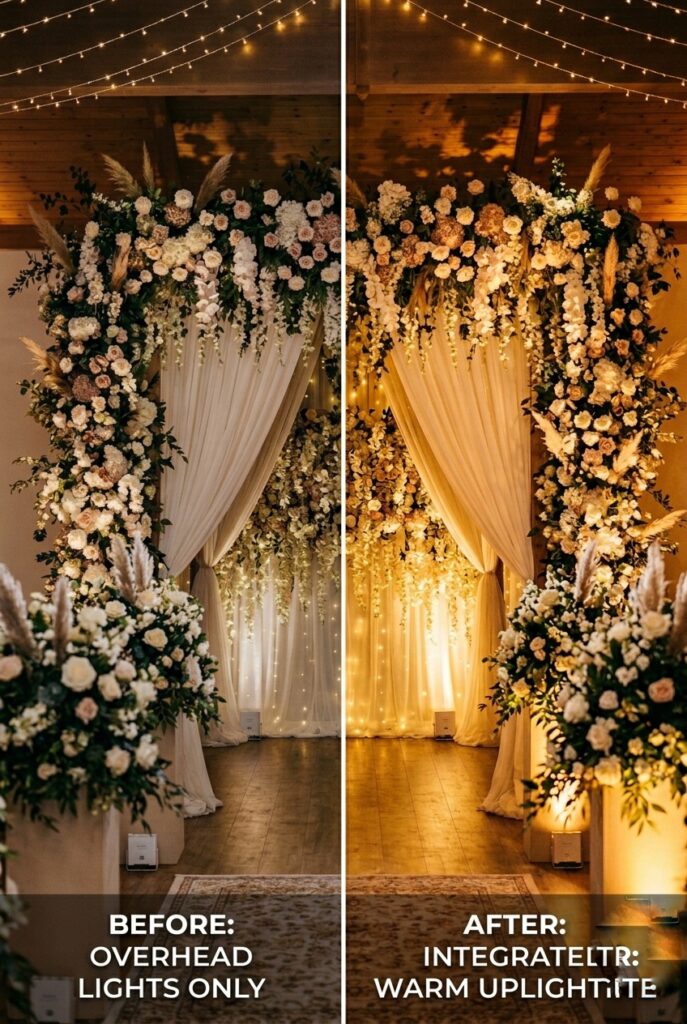
1. Uplighting: The Foundation That Changes Everything

Side-by-side comparison of the same reception aisle decorated identically—one image without uplighting looking flat and ordinary, the other with warm golden uplighting creating drama and glow
Image prompt: Photorealistic side-by-side image comparison showing the transformation that uplighting creates. Left side: the same wedding reception aisle without uplighting—overhead lights only, flowers visible but flat, walls unmarked, overall aesthetic feels like a generic event space. Right side: identical setup but with warm golden uplighting positioned at the base of floral arrangements and along the walls, angling upward—the same flowers now glow, the aisle appears luminous and defined, the walls have depth and color, the overall aesthetic is transformed from "decorated" to "designed." Both images are photographed from the same angle to show the direct impact of uplighting. The contrast demonstrates why light is the foundation. Generate in vertical portrait orientation, 2:3 aspect ratio, optimized for mobile display.

Uplighting is the single most underestimated tool in reception design.

It’s light positioned at ground level, angled up at walls, architectural elements, or decor.

It transforms space from “decorated” to “designed.”

What uplighting does:

  • Defines the aisle visually (guests can see the path you’re walking)
  • Creates emotional warmth or drama depending on color (warm amber = romantic, cool blue = modern, white = elegant)
  • Makes flowers glow from within rather than look flat
  • Creates depth perception—uplit elements appear closer and more important
  • Photographs as intentional design (cameras love uplighting; overhead light alone photographs as “event space”)

Color psychology matters:

  • Warm amber/gold: romantic, intimate, timeless. Works with every flower color.
  • Soft white: elegant, contemporary, clean. Shows flower colors truest.
  • Blush/rose tones: feminine, soft, dreamy. Works beautifully with white/blush florals.
  • Avoid: bright primary colors, neon effects. These look trendy and read as “effects” rather than “design.”

The cheap-wrong version: Random uplighting that washes out walls or creates a nightclub vibe.

This happens when (1) the wrong color is chosen for your aesthetic, (2) lights are too bright/intense, or (3) they’re placed too far from the focal points.

Solution: work with a lighting designer (not a DJ who “throws in lights”).

Rental companies typically offer color-matched uplighting that adapts to your palette—invest $200–$500 here, not in extra flowers.

Budget: $200–$500 for professional uplighting rental and programming. Where to buy: event lighting rental companies (search “wedding uplighting rental [your city]”), not DJ companies.


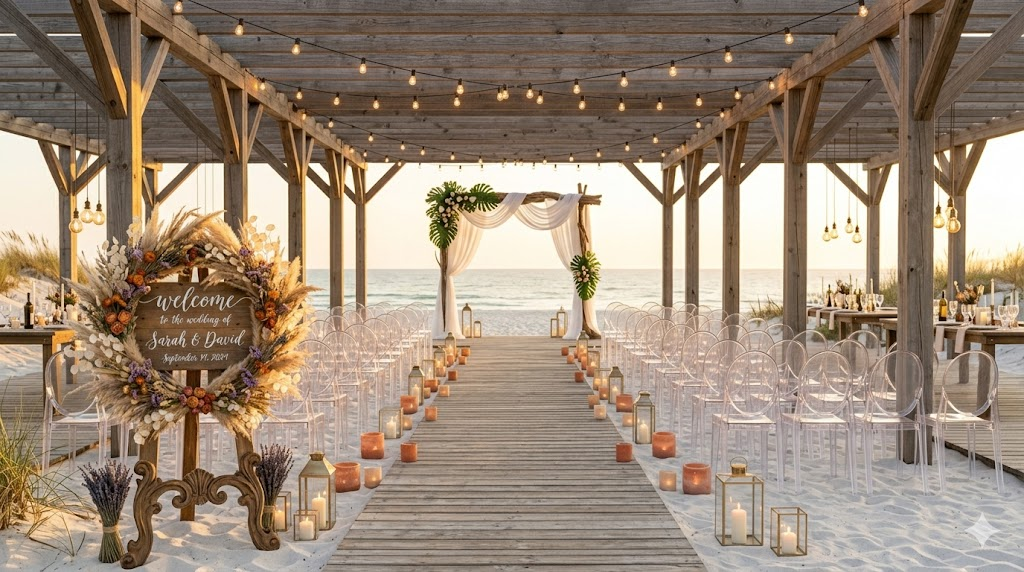
2. The Focal Point Arch or Backdrop: Your Visual Anchor

 Large ornate altar floral arrangements on pedestals, repositioned at the reception entrance, flanking the doorway where guests enter to welcome them
Image prompt: Photorealistic image of two large altar-scale floral arrangements on matching pedestals positioned on either side of a reception entrance doorway. The arrangements are approximately 3–4 feet tall, featuring roses, hydrangeas, greenery, and lush blooms in soft wedding colors (blush, ivory, sage, white). The pedestals are elegant and match—marble, wood, or metal in a cohesive style. The arrangement creates a formal, luxe entrance. Warm lighting illuminates the flowers. The doorway shows the reception space beyond, slightly out of focus. The image conveys grandeur and welcome. Generate in vertical portrait orientation, 2:3 aspect ratio, optimized for mobile display.

Every reception entrance needs one clear focal point—where the guest’s eye lands the moment you appear.

This can be an arch, a draped backdrop, a floral installation, or a statement wall. Without it, the space feels aimless.

Designing a focal point that works:

  • Scale: It must be visible from the back of the room.
  • If your entrance spans 30 feet, your focal point should be 8–12 feet tall minimum.
  • Contrast: It must read differently from the background. A white arch on white walls disappears. Add fabric draping, flowers, or lighting that creates visual separation.
  • Layering: Depth creates visual interest. A flat arch reads 2D. Layered fabric (multiple layers of tulle or chiffon), cascading flowers, and hanging light elements create 3D depth.
  • Light interaction: Does your focal point interact with light beautifully? Sheer fabrics glow under uplighting. Metallic elements catch and reflect light. Fresh flowers absorb light. Choose materials your design lighting will enhance.

Common focal point approaches:

  • Arch with cascading florals and fabric draping: Romantic, timeless, photographs beautifully. $600–$1,500.
  • Draped backdrop with custom signage and uplighting: Modern, clean, versatile. $400–$1,000.
  • Floral wall or installation with hanging light elements: Instagram-worthy, dramatic, high-impact. $800–$2,000.
  • Minimalist arch with statement lighting (chandelier, projection, or hanging fixture): Contemporary, bold, relies on light as the hero element. $500–$1,200.

The cheap-wrong version: An arch or backdrop so small or neutral it disappears in photographs.

One couple created a delicate arch that looked beautiful to live eyes but photographed as a tiny detail lost in the room.

Solution: test your focal point with your photographer weeks before.

Have them shoot it from the entrance perspective (where guests will be) and from the side (where cake-cutting and dancing photos happen).

This reveals what actually photographs.


3. Lighting as Emotion: Color, Intensity, and Timing

IMAGE 3 HERE Alt text: Three identical reception aisle scenes lit with three different color temperatures—warm gold creating romance, cool white creating elegance, and soft blush creating dreaminess—showing how light color changes emotional perception Image prompt: Photorealistic image showing three versions of the same reception entrance aisle, side-by-side, illuminated with three different uplighting colors. Left: warm golden-amber uplighting, creating a romantic, intimate, amber-glowing aesthetic. Center: cool soft-white uplighting, creating an elegant, contemporary, clear-light aesthetic. Right: soft blush or rose-tinted uplighting, creating a dreamy, feminine, delicate aesthetic. The flowers, arch, and decor are identical in all three versions—only the light color changes. The contrast demonstrates how light color fundamentally changes the emotional tone of the space without changing any physical elements. The most elegant version appears brightest and most defined; the romantic version feels most intimate; the blush version feels most dreamy. Generate in vertical portrait orientation, 2:3 aspect ratio, optimized for mobile display.

Light doesn’t just illuminate—it creates emotional context. The same space lit in cool blue feels different from warm gold, even with identical decor.

Emotional lighting context:

  • Warm amber/gold: Intimacy, romance, nostalgia. Couples feel close, romantic. Guests relax.
  • Soft white: Clarity, elegance, modernity. Creates focus without emotional weight.
  • Blush/rose: Femininity, softness, dreaminess. Works beautifully for romantic aesthetics.
  • Cool lavender or blush-white: Contemporary, slightly magical. Works for boho or modern themes.
  • Avoid: Bright white (feels institutional), rainbow colors (reads as event rather than wedding), harsh spotlights (creates harsh shadows, unflattering for photos).

Intensity matters: Light that’s too bright washes out flowers and skin tones in photos. Light that’s too dim reads as gloomy.

The sweet spot is 40–60% of standard overhead lighting intensity, with that reduced light coming from uplighting and architectural elements rather than from above.

Timing and transition: If your DJ announces you at a specific moment, coordinate lighting timing to that announcement.

Lights could come UP as music starts, creating anticipation.

Or lights could shift COLOR as you’re announced, creating a visual cue for guests to turn and look.

This is a technical detail but creates a polished, choreographed feel.

Budget: $200–$400 for lighting design and programming (often included with uplighting rental).

Where to buy: event lighting rental company, not DJ company.


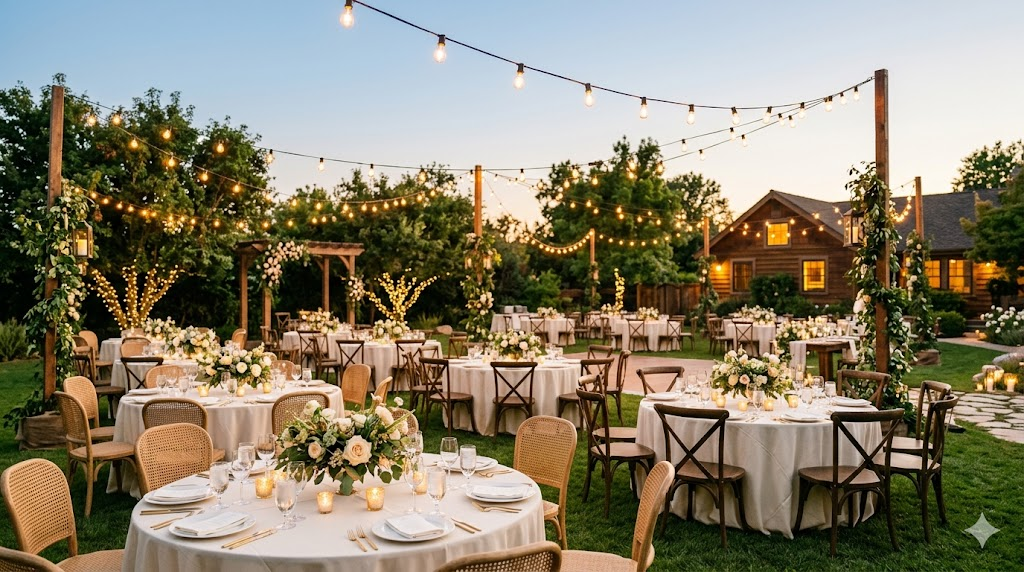
4. Hanging Light Elements: Creating Visual Depth from Above

IMAGE 4 HERE
Alt text: Reception aisle viewed from below looking up, showing hanging florals, string lights, or a chandelier creating a canopy effect overhead while the floor-level aisle is visible below
Image prompt: Photorealistic image shot from a low angle or looking upward into a reception aisle entrance space. Overhead, hanging elements are prominent: cascading floral installations or garland with greenery and flowers, strands of warm string lights or café lights creating a canopy, or an ornate hanging chandelier. The hanging elements create a frame or tunnel effect overhead. Below them, the aisle floor is visible with flowers, candlelight, or a runner. The image demonstrates the depth created by overhead design—the space feels enveloped and intentional, not just decorated at floor level. The overhead elements catch light beautifully and photograph as a designed moment. Generate in vertical portrait orientation, 2:3 aspect ratio, optimized for mobile display.

Most couples focus on floor-level decor and miss that hanging elements create depth and frame the moment from above.

Effective hanging light elements:

  • Chandelier or hanging light fixture: Creates a romantic focal point, especially effective over the aisle or focal point. $200–$800 to rent.
  • String lights or café lights: Create a canopy effect. Works beautifully for garden or intimate entrances. $100–$400 to rent.
  • Hanging florals or greenery installations: Frame the aisle overhead, creating a garden-like tunnel effect. $300–$800 from florist.
  • Projection mapping or uplighting projection: Projects patterns or custom imagery on the ceiling or walls. High-impact, contemporary. $400–$1,200.

Why overhead elements matter: Your photographer shoots from many angles.

If you only decorate at floor level, overhead angles look empty.

Hanging elements ensure depth and intentionality from every sightline.

The cheap-wrong version: Hanging elements that are too small or too sparse to read as intentional design.

One couple hung small paper lanterns that looked darling to the eye but photographed as tiny, insignificant dots.

Solution: if you’re hanging something, go bold—make it large enough to read from 30 feet away.

Budget: $200–$1,000 depending on complexity and type. Where to buy: event rental company (lighting, structural elements), florist (floral installations).


5. The Photographer’s Moment: Designing for How Cameras See Light

IMAGE 5 HERE Alt text: A photographer's technical perspective showing the same reception entrance captured from three different camera angles—entrance view, side view, overhead—demonstrating which angles are best lit and which reveal design problems Image prompt: Photorealistic image showing three photographs of the same reception entrance taken from three different angles. Top: photographer's perspective from the entrance (where guests stand), showing the focal point and aisle leading toward it. Middle: side angle photographer's perspective, showing the depth and layering of the design. Bottom: overhead or high-angle perspective showing the floor-level placement of flowers and light. The images show how different camera positions reveal different aspects of the design—some angles show the focal point clearly, others show aisle definition, others show depth. The images demonstrate why testing multiple angles before the wedding matters for design decisions. Generate in vertical portrait orientation, 2:3 aspect ratio, optimized for mobile display.

This is the insider knowledge that separates good design from great design: your eyes and your photographer’s camera see light completely differently.

What your eye sees: Balanced, natural light. If you’re in a dimly lit space, your eye adjusts and perceives more detail than actually exists.

What the camera sees: Raw light levels without eye adjustment.

Dim spaces photograph very dark or muddy. Backlighting that looks romantic to you photographs as silhouettes.

Harsh side-lighting that looks fine to your eye creates unflattering shadows on skin.

Work with your photographer:

  • Before the wedding, have your photographer visit the venue during the same time of day as your reception.Take test photos of your entrance design in actual lighting conditions.
  • Ask: “Does this focal point photograph as impressive as it looks to my eye?” The answer is often no.
  • Ask: “Where will you position yourself to shoot my entrance? What do you need from the lighting to make this photograph beautifully?” Listen to their technical needs.
  • Specific request: “Please shoot from three angles—from the entrance where guests stand, from the left side, and from above if possible.”

Common photography fails that good design prevents:

  • Backlighting your arch without front light = silhouette of you (not ideal)
  • Aisle flowers lit only from above = flowers look flat in photos
  • Focal point too dark relative to the couple = guests see you, but the arch disappears
  • No separation lighting = you blend into the background

Budget: $0 (just communication with your photographer). Where to buy: schedule a pre-wedding site visit with your photographer, not a vendor.


Budget Hack #1: Rent Professional Uplighting Instead of Buying Extra Flowers Most couples add more flowers to make an entrance look more expensive and impressive.

Reality: a smaller number of beautiful flowers lit with professional uplighting reads as more expensive and intentional than abundant flowers under harsh overhead light.

One couple reduced their aisle flowers by 30% but invested in warm uplighting—their photographer said it looked more designed and intimate. Uplighting rental ($200–$400) costs less than extra floral arrangements ($300–$600) and photographs better.


6. Movement and Music: The Choreography That Creates Moments

IMAGE 6 HERE Alt text: A sequence of four frames showing the couple's journey down the aisle—entering, walking, pausing at the focal point with light catching them, and arriving at the destination—showing how choreography and timing create multiple photograph-worthy moments Image prompt: Photorealistic image showing four sequential moments as a couple walks down their reception aisle in a choreographed entrance. Frame 1: The couple appears at the entrance, backlit by uplighting, music is starting. Frame 2: They walk slowly down the aisle, lit from both sides, guests visible and reacting. Frame 3: They pause at or near the focal point (arch or backdrop), bathed in spotlight or focused uplighting, this is the "official moment." Frame 4: They arrive at their destination (dance floor or sweetheart table), the moment complete. The four frames demonstrate how deliberate movement and timing create multiple camera-worthy moments rather than a single static image. The lighting, music timing, and movement are coordinated for maximum impact. Generate in vertical portrait orientation, 2:3 aspect ratio, optimized for mobile display.

The aisle isn’t just a physical space—it’s a choreographed moment. How you move through it, what music plays, and what lighting cues accompany your movement make it memorable or forgettable.

Choreography considerations:

  • Speed: A slow, deliberate walk reads as romantic and gives photographers time to capture multiple angles. A fast walk (natural pace) reads as joyful and energetic.
  • Music: The song matters. Does your entrance music match the emotional tone of your aisle design? Dramatic music with minimal, minimalist aisle design feels mismatched. Romantic music with romantic design reinforces the moment.
  • Timing: Is there a beat drop or musical moment that coincides with your appearance? Coordinate with your DJ so the music cue happens as you enter—this creates a cinematic moment.
  • Pauses: Do you pause at the focal point, or walk straight through? A pause creates a “official moment” for photos and allows guests to process and cheer.

The technical reality: Your DJ and photographer need to know your song choice, your entrance timing, and any planned pauses. Write it in your reception timeline. Send it to vendors one week before.

Budget: $0 (just coordination). Where to buy: communication with DJ and photographer.


7. Specialty Effects: When They Work and When They’re Distracting

IMAGE 7 HERE Alt text: Reception entrance with subtle low-lying fog creating a haze around the couple's feet while they walk, making them appear to float, lit beautifully without distracting from the moment Image prompt: Photorealistic image of a reception entrance using low-lying fog/haze effect tastefully. The couple walks down the aisle, and warm golden uplighting creates a glow around them. Low-lying fog hugs the ground, creating a subtle "dancing on a cloud" effect around their feet and the lower portion of the aisle. The fog is NOT dense or overwhelming—you can see the couple and the aisle clearly, but there's an ethereal quality to the light and haze. The effect enhances romance without distracting. The focal point arch or backdrop is visible and clear. The image shows restraint and taste—the effect serves the moment rather than competing with it. Generate in vertical portrait orientation, 2:3 aspect ratio, optimized for mobile display.

Fog machines, confetti cannons, projection mapping, and pyrotechnics are tempting.

But they can also distract from the actual moment—you and your new spouse.

Effects that work:

  • Low-lying fog/haze: Creates a “dancing on a cloud” effect. Works beautifully with uplighting. Feels magical without being distracting. Cost: $150–$300 (rental company, not DIY fog juice).
  • Projection mapping on walls or ceilings: Creates visual interest without distracting from you. Works for monogram, pattern, or custom imagery. Cost: $500–$1,500.
  • Confetti or flower petal drop: Minimal, adds joy without overwhelming. Works if coordinated with your movement (drops as you walk, not before you enter). Cost: $100–$300.

Effects that often distract:

  • Sparklers: Bright, distracting, blocks sightlines to photos, creates smoke. Guests focus on sparklers, not you.
  • Excessive confetti cannons: Feels party-like rather than wedding-like. Creates a mess that dominates photos.
  • Oversized balloon drops: Entertaining but reads more “event” than “wedding moment.” Guests laugh and cheer—dividing attention.

The principle: Effects should enhance the moment, not replace it. The moment is you, your spouse, and your love story. Everything else supports that.

Budget: $150–$500 for effects (if chosen). Where to buy: event rental companies, DJ companies for effects coordination.


8. Color Palette Coordination: Making Flowers Glow Under Light

IMAGE 8 HERE Alt text: Close-up detail of wedding flowers in different uplighting colors—the same arrangement photographed under warm gold light (appearing luminous), cool white light (appearing crisp), and blush-tinted light (appearing soft)—showing color interaction Image prompt: Photorealistic close-up image showing the same floral arrangement in three different uplighting scenarios. Left side: the same white and blush roses, greenery, and baby's breath illuminated by warm golden uplighting—the flowers appear luminous, warm, romantic, colors are enhanced. Center: identical arrangement under cool soft-white uplighting—flowers appear crisp, elegant, true-to-color, but colder in tone. Right side: identical arrangement under soft blush or rose-tinted uplighting—flowers appear soft, dreamy, slightly washed. The three photos demonstrate how uplighting color dramatically changes how flowers photograph and appear. The warm gold version appears most luxe and expensive; the white version appears most elegant; the blush version appears most romantic. The surrounding darkness shows the light is coming from uplighting, not ambient. Generate in vertical portrait orientation, 2:3 aspect ratio, optimized for mobile display.

Lighting and flower color must work together, not compete. A flower color that’s stunning in daylight can look muddy under certain uplighting colors.

Color pairing guide:

  • White or cream flowers + warm gold uplighting: Classic, timeless, photographs beautifully. Flowers glow.
  • Blush or soft pink flowers + warm gold uplighting: Romantic, soft, dreamy. Pink flowers glow warmth and femininity.
  • White flowers + cool white uplighting: Contemporary, clean, elegant. Shows true flower colors.
  • Deep red or burgundy flowers + warm gold uplighting: Dramatic, luxe, sophisticated. The warmth brings out depth in dark colors.
  • Avoid: Pale or white flowers under cool blue or blush-tinted lighting (flowers appear washed out). Busy patterned flowers under projection lighting (too much visual competition).

Work with your florist: Show your florist the actual uplighting color (not a swatch, but the actual rental light). Have them suggest flowers that will photograph beautifully under that specific light.

This 10-minute conversation saves thousands in design impact.

Budget: $0 (coordination with florist).

Where to buy: communication with florist and lighting rental company simultaneously.


Budget Hack #2: Invest in Lighting First, Flowers Second Most couples allocate 60% of entrance budget to flowers and 40% to structure/misc.

Flip this. Allocate 40% to flowers and 60% to lighting (uplighting, focal point lighting, any specialty effects).

A modest number of beautiful flowers lit professionally photographs and reads as expensive.

Abundant flowers under bad lighting photograph as cluttered.

One couple moved $400 from flowers to lighting and reported their photos looked significantly more polished and expensive.


Decision Filter

Intimate, romantic aesthetic (under 100 guests)? Go minimal on decoration—focus on lighting warmth and a single elegant focal point.

Overhead string lights or a small chandelier. Plenty of white/blush flowers, but restrained.

Let lighting do the emotional work. Budget: $800–$1,500 (light-focused, flowers minimal).

Glamorous, statement aesthetic (100+ guests, ballroom or grand venue)? Go bold—layered focal point, dramatic uplighting, hanging elements creating depth.

More flowers for visual abundance.

Statement lighting (chandelier, projection, or complex installation). Budget: $1,500–$3,000+ (flowers and lighting equally weighted).

Garden, boho, or outdoor aesthetic? Focus on natural light (golden hour timing if possible), overhead string lights, garden-style flowers, minimalist structure.

Relying on natural light means you need excellent photographer positioning.

Budget: $600–$1,500 (less rental, more natural elements).

Budget under $1,000 for entrance? Skip specialty effects and complicated focal points.

Invest everything in one beautiful arch/backdrop ($400–$600) and professional uplighting ($300–$400).

Let those two elements carry the design. Budget: $700–$1,000 (laser-focused on light and one focal point).


The Real Reason

Here’s what the best wedding photographers know: light is everything.

A beautiful bride and groom in bad light photograph as ordinary.

An average setup in beautiful light photographs as intentional, expensive, and romantic.

Couples who invest in lighting design rather than decoration abundance end up with photos they treasure forever.

The insider knowledge a designer knows: reception entrances that feel unforgettable combine three things—one clear focal point that photographs beautifully, light that creates emotional context, and movement that’s choreographed to that lighting.

Not random pretty things, but intentional design where every element serves the story of the moment.

This is what separates the entrances guests remember for decades from the ones they forget by dessert.


Mistakes to Avoid

Mistake 1: Assuming your eye’s perception of light equals the camera’s perception Couples design lighting around what looks good to them in the moment, forgetting that cameras see light mathematically, not emotionally.

An entrance that feels romantic and intimate to your eye can photograph as too dark, muddy, or unflattering.

Solution: do a lighting and design test with your photographer before the wedding.

Mistake 2: Prioritizing flower abundance over light quality One couple spent $2,000 on elaborate floral arrangements but skipped professional uplighting (to save $300).

Photos showed flowers as shadowy and undefined.

A modest arrangement lit beautifully would have photographed significantly better.

Solution: budget lighting as 40–60% of entrance design spending, not as an afterthought.

Mistake 3: Including specialty effects that compete with the moment rather than serve it One couple planned fog, projection mapping, and confetti simultaneously. The entrance photos are cluttered and confusing—your eyes don’t know where to focus.

Solution: choose one specialty effect maximum, and only if it genuinely serves your aesthetic and doesn’t distract from the couple.

Mistake 4: Not testing the focal point focal point photograph differently than how it looks in person One couple designed a delicate, intricate focal point that looked beautiful to their eye.

Test photos from the photographer revealed it photographed as underwhelming and lost in the room. They had to redesign weeks before the wedding.

Solution: photograph your focal point design in the actual venue, in actual lighting conditions, before committing.


FAQ

How far in advance should I book uplighting and specialty lighting rentals?

Lighting rental companies book 4–8 weeks in advance during peak season.

Ideally, book at your venue walkthrough (3+ months out) so you can test colors and placements in the actual space.

Budget for a site visit meeting with the lighting designer ($0–$100, often waived) to discuss your aesthetic and test colors.

Do I need to choose between an elaborate focal point and dramatic lighting, or can I do both?

You can do both, but prioritize one as the hero element.

If your focal point is already dramatic and ornate, let lighting support it subtly. If your focal point is minimal, let dramatic lighting (color, effects, projection) be the hero.

Trying to make everything “all-star” results in visual chaos.

One thing should be the dominant focal point; everything else supports it.

What’s the realistic timeline for my DJ, photographer, and lighting technician to coordinate my entrance?

Provide all three with your final entrance details (song, timing, any pauses, lighting cues) one week before the wedding.

Ask your DJ to do a sound check of your entrance music at the final venue walkthrough.

Ask your lighting technician to confirm light cues (when lights come up, when color shifts, any timing syncs with music). This prevents day-of miscommunication.

If my venue already has decent overhead lighting, do I still need uplighting and specialty lighting?

Overhead lighting alone photographs as flat and reads as “event space.” Uplighting adds intentional design and emotion that overhead light can’t.

If budget is limited, skip the focal point flowers and spend on uplighting only—that single element transforms the space visually more than any decor.

The answer is: yes, uplighting is worth it even with decent overhead light.


Budget Table

Reception Entrance ElementMinimalElegantGrandWhere to Buy
Focal Point (arch/backdrop/installation)$200–$400$600–$1,000$1,200–$2,000Florist, rental company
Uplighting and Color Programming$200–$300$400–$600$600–$900Event lighting rental
Hanging Light Elements or Fixture$0$200–$400$400–$800Rental company
Aisle Flowers$200–$300$400–$700$700–$1,200Florist
Specialty Effect (fog, projection, confetti)$0$150–$300$300–$500Rental company, DJ
Photographer Site Visit and Consultation$0$0$0Communication only
Total Reception Entrance$600–$1,000$1,650–$3,100$3,200–$5,400Mixed sources

Your reception entrance is the most-watched, most-photographed moment of your day when everyone is focused on the same thing.

Design it as such.

Start with light, build the focal point around that light, choreograph your movement to the music and lighting cues, and design flowers that glow under your chosen lighting.

Then have your photographer test it in reality before the day arrives.

This isn’t overthinking—this is intentional design that transforms a 30-second walk into the moment your album will open to for decades.

Book your lighting consultation this week.

Choose your uplighting color by next week.

Then design your flowers and focal point around that light rather than the other way around.

When light is your foundation, everything else glow.

Leave a Comment

Your email address will not be published. Required fields are marked *

Scroll to Top