
Your reception backdrop gets photographed more than your ceremony arch.
Guests photograph their meals in front of it. Toasts happen in front of it.
It frames every single photo for 4–6 hours straight.
Yet couples spend a fraction of the time planning it compared to their ceremony backdrop, and then get charged triple by vendors for doing it.
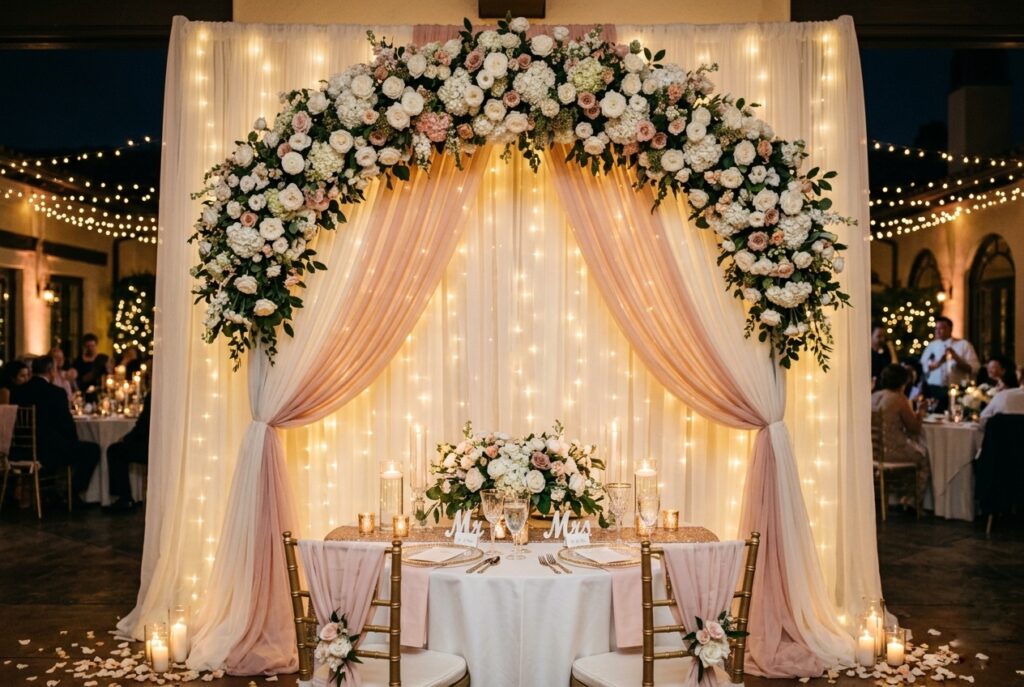
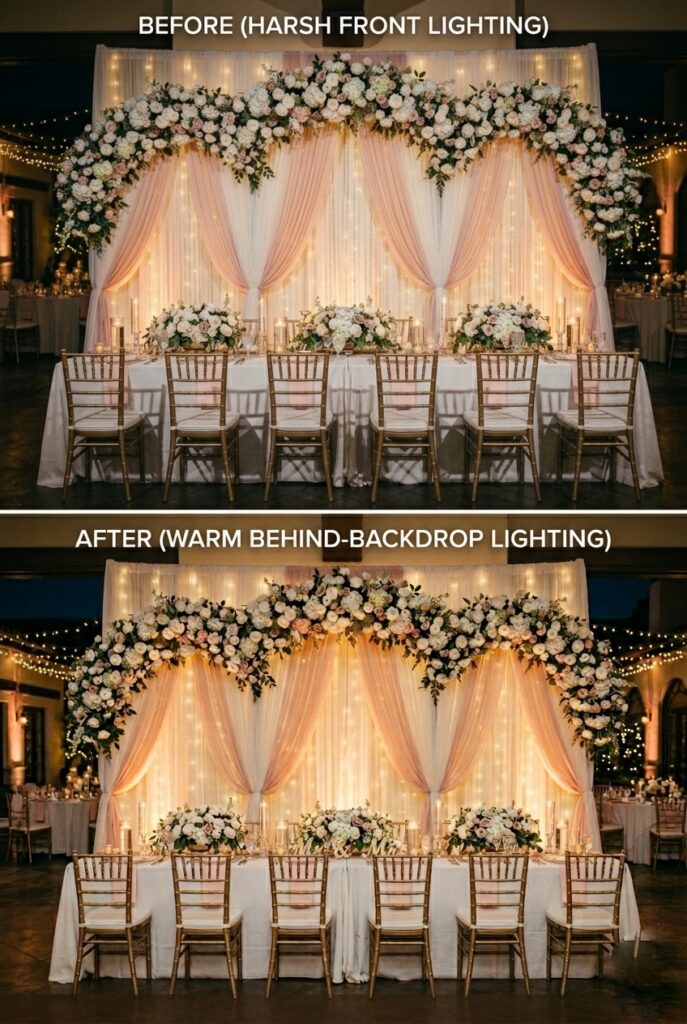
Lights behind fabric, not in front of it—this is the difference guests see.
The Short Answer
A reception backdrop needs to be wider and simpler than a ceremony backdrop because guests view it from multiple angles over hours, not just from the ceremony position for 30 minutes.
Your head or sweetheart table backdrop should be 10–12 feet wide minimum (not 8 feet), positioned 12–18 inches away from the wall (not flat against it), and lit from behind with warm-white fairy lights or uplighting.
Vendors charge $600–$1,500 for what costs $150–$300 in materials if you do the install work yourself.
The markup isn’t for the materials—it’s for labor and logistics you might be able to DIY if your space allows.
1. Sweetheart Table vs. Head Table (Different Backdrop Sizes)
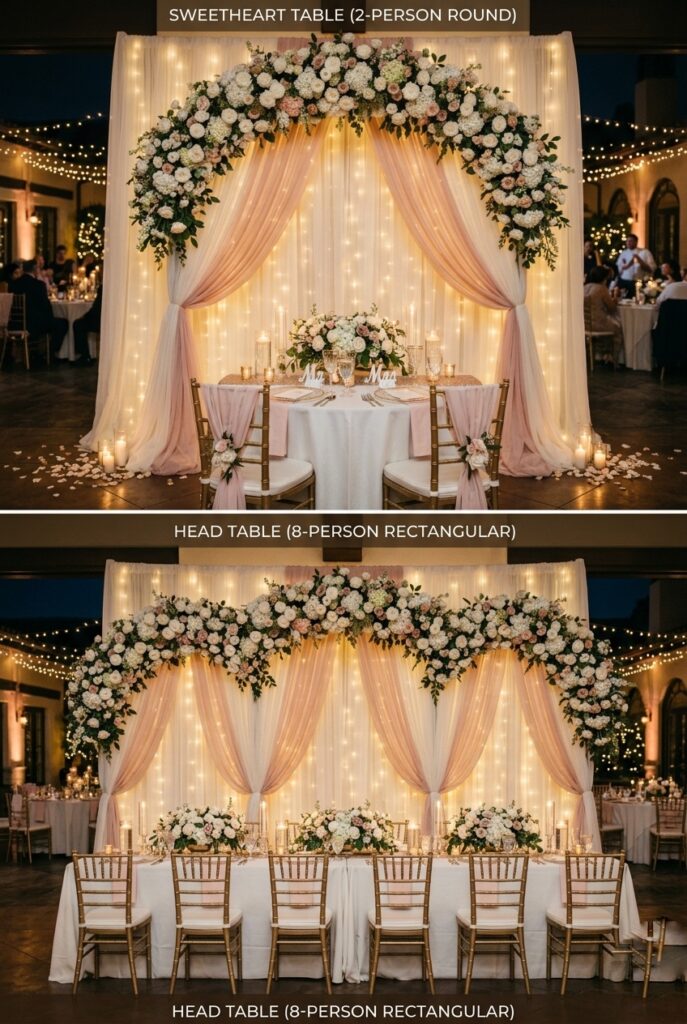
A sweetheart table (two chairs, intimate, front and center) needs a tighter, more detailed backdrop because it gets close-range photography.
A head table (long table, wedding party) needs a wider, simpler backdrop because it photographs from father back and has to work visually whether people are looking at it from the left side, right side, or straight on.
Sweetheart backdrop: 8–10 feet wide, 7–8 feet tall. Can be highly detailed (dense florals, lots of layers) because photos are close-up and intimate.
Head table backdrop: 10–14 feet wide, 8–10 feet tall.
Needs to be slightly less detailed (scaled-up but cleaner) because it’s viewed from variable distances and angles.
Most couples size their reception backdrop too small (trying to save money) and then have to buy additional fabric to patch gaps when installed.
Oversized is actually cheaper in the long run—extra fabric costs $15, undersized gaps cost frustration and additional renting.
Price range: Same materials cost; sizing determines rental cost ($150–$250 for 8ft backdrop, $300–$500 for 12ft).
2. Drapery Rental vs. DIY Fabric Installation (Vendor Markup Exposed)
Here’s the pricing breakdown vendors don’t advertise:
- Crystal bead curtains, 20 feet × 12 feet: $324 to purchase on Amazon or Etsy
- Same curtains rented through a wedding linen vendor: $600–$1,200
- Labor to install: vendor charges $200–$500
- Your actual cost if DIY install: $324 + your time
Drapery rental companies mark up materials 200–300%. They also bundle in “professional installation,” which involves hanging pipes and adjusting pleats.
If your venue has pre-hung pipe or if you’re comfortable with basic hanging, you can source the same curtains directly and handle installation yourself with 2–3 people and 1–2 hours of time.
The catch: you need to physically have time day-of to install, and it requires some basic hardware knowledge.
If you’re traveling to your venue or have no setup time, the vendor markup is worth the convenience.
Price range: DIY drapery $150–$400, Vendor rental $600–$1,500. Where to buy: Etsy (search “crystal curtains” or “iridescent curtains”), Amazon (same), or local fabric stores if budget allows bulk purchase.
Budget Hack: Buy crystal or beaded curtains on Amazon (under $350), use the 40% Hobby Lobby coupon on basic white tulle as a base layer ($20), and handle installation with 2–3 friends the night before or morning of. Total cost: $150–$200. One bride I worked with did this and guests asked if she hired a professional decorator. The vendor would have charged her $1,000+.
3. Fabric + Lighting (The Real Cost Difference)

The difference between a $300 reception backdrop and a $3,000 one isn’t the fabric—it’s the lighting.
Fabric alone (even premium silk or linen) costs $30–$80 per panel. Lighting (proper uplighting, fairy lights positioned correctly, spotlights) costs $200–$600 to rent, or $50–$100 to DIY with battery-powered options.
Fabric hanging flat against a wall = invisible, sad backdrop. Fabric with warm-white uplighting behind it = luxurious, expensive-looking backdrop.
Position lights 6–12 inches behind your fabric, not in front. Lights in front create harsh shadows.
Lights in back create a glow that photographs beautifully and makes your backdrop read as intentionally designed.
Price range: Fabric $50–$200, Lighting rentals $200–$600, DIY lighting (fairy lights) $40–$100. Where to buy:Amazon (fabric and fairy lights), party rental companies (uplighting).
4. Floral Backdrops vs. Fabric-Only (Function Matters)
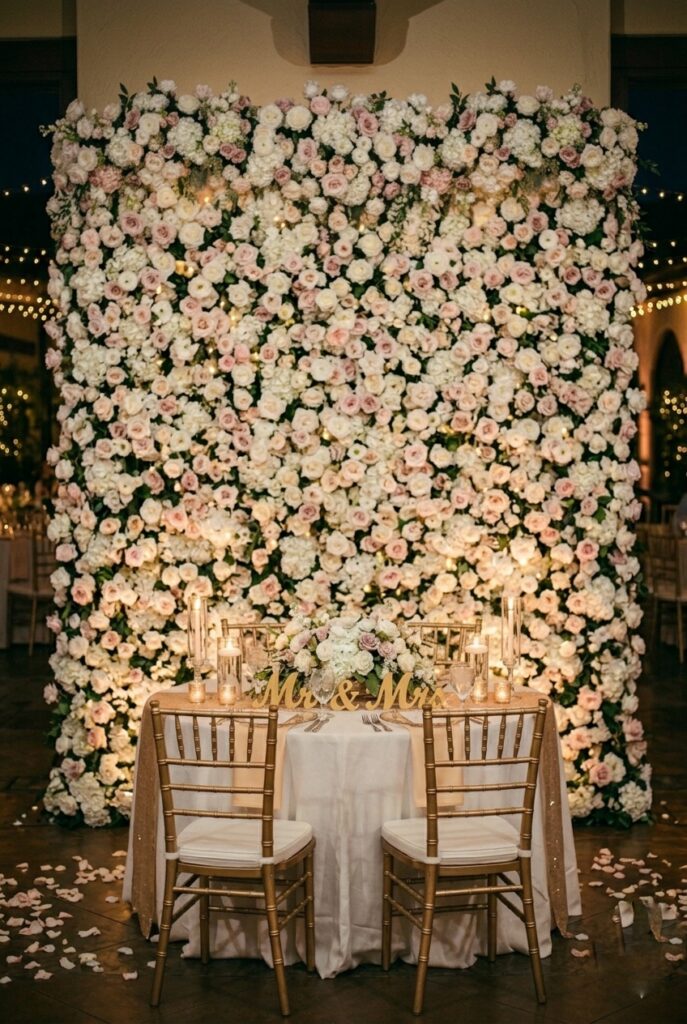
A floral-heavy backdrop works for a ceremony (static, one viewpoint).
For a reception, flowers on a backdrop get in the way—guests want clear sightlines to the couple, and flowers block them at table height.
Plus, fresh flowers on a backdrop wilt by dinner, and you’ll be replacing wilted sections throughout the night.
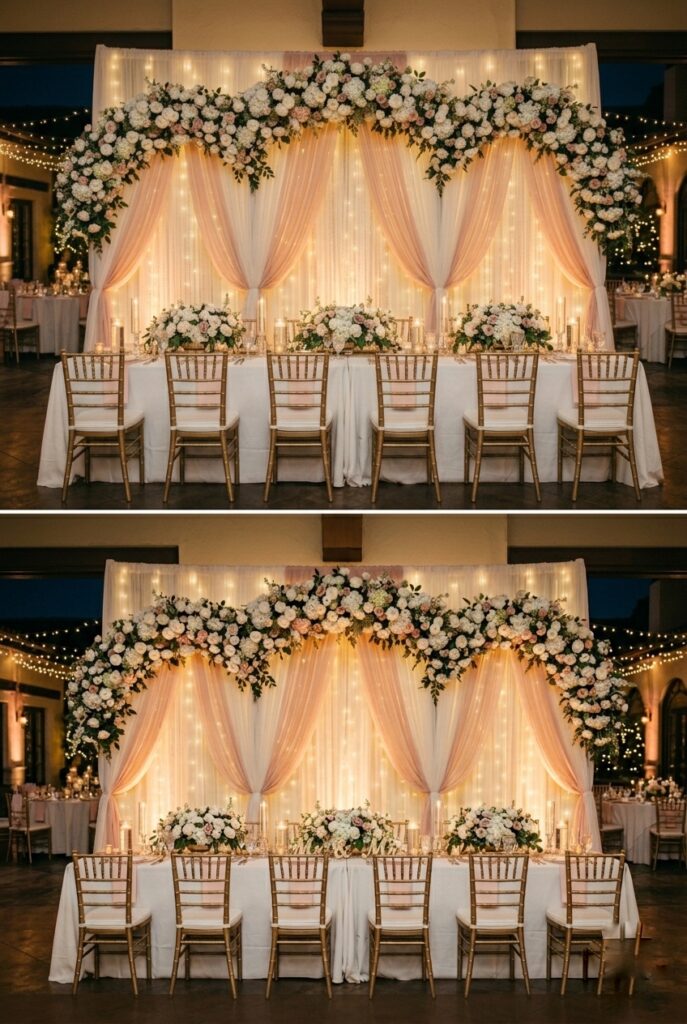
For reception backdrops: use flowers only at the TOP center (18–24 inches focal area), then rely on fabric and lighting for the rest. This keeps the focal area beautiful and detailed while giving sight lines and visual breathing room.
Price range: All-fabric $50–$200, Fabric + focal floral installation $300–$600. Where to buy: Local florist (for focal flowers only), Amazon (fabric).
5. Sizing and Placement Mistakes (Professional Installers Know This)
The number one sizing mistake: buying a backdrop that’s too narrow for the space. A 6–8-foot-wide backdrop behind a 10-foot head table looks sad and lost.
At minimum, your backdrop should be 10–12 feet wide—preferably extending slightly past the table on both sides.
The number two placement mistake: installing flush against the wall.
Your backdrop needs 12–18 inches of space between it and the wall, so lights and hands can fit behind it and so it reads as a separate visual element, not a flat wall covering.
These two mistakes aren’t about cost—they’re about installation knowledge.
Professional installers know this.
They charge for the expertise, even though the actual adjustment (buying wider fabric, placing it 18 inches out) costs nothing extra.
Pro positioning technique: Measure your table width. Multiply by 1.5.
That’s your minimum backdrop width. Position the backdrop center behind your table, allowing 12–18 inches clearance from the wall.
This simple math eliminates 80% of reception backdrop failures.
6. Reception Photo Area Backdrops (Different Purpose Entirely)
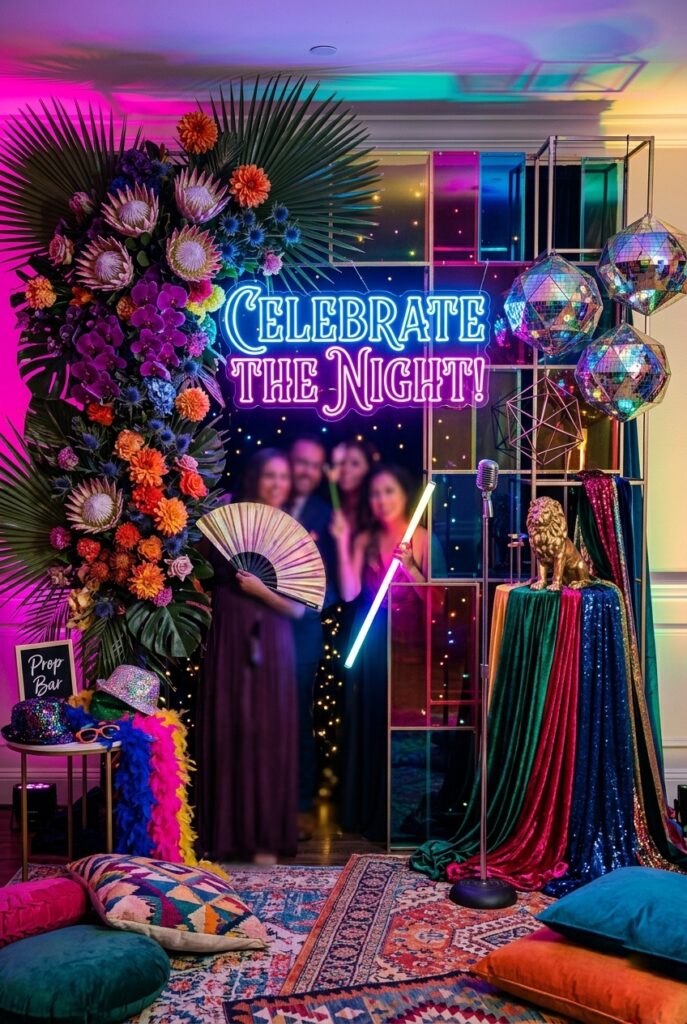
Photo areas (separate from head/sweetheart tables) serve a completely different function.
These are for guests to take selfies or group photos during cocktail hour or reception.
They need bold visual interest (which can include dense florals, statement signs, neon) because they’re specifically designed to be photographed as a focal point.
Reception photo areas can actually benefit from what head table backdrops should avoid: density, multiple focal points, bold patterns.
A photo booth backdrop WANTS to be cluttered and interesting.
A head table backdrop NEEDS to be clean and readable because the people are the focus.
Most couples try to use the same backdrop for both purposes (head table AND photo area).
This creates a compromise that fails both functions.
Better approach: simple, elegant backdrop for head/sweetheart table; bold, detailed backdrop for photo area (set up somewhere else in the room).
Price range: Photo area backdrops $150–$500 (can be more colorful and less expensive-looking because they’re intentionally statement-focused). Where to buy: Etsy (search “wedding photo booth backdrop”), Amazon, or custom printing services.
7. Cake Table Backdrops (The Forgotten Focal Point)
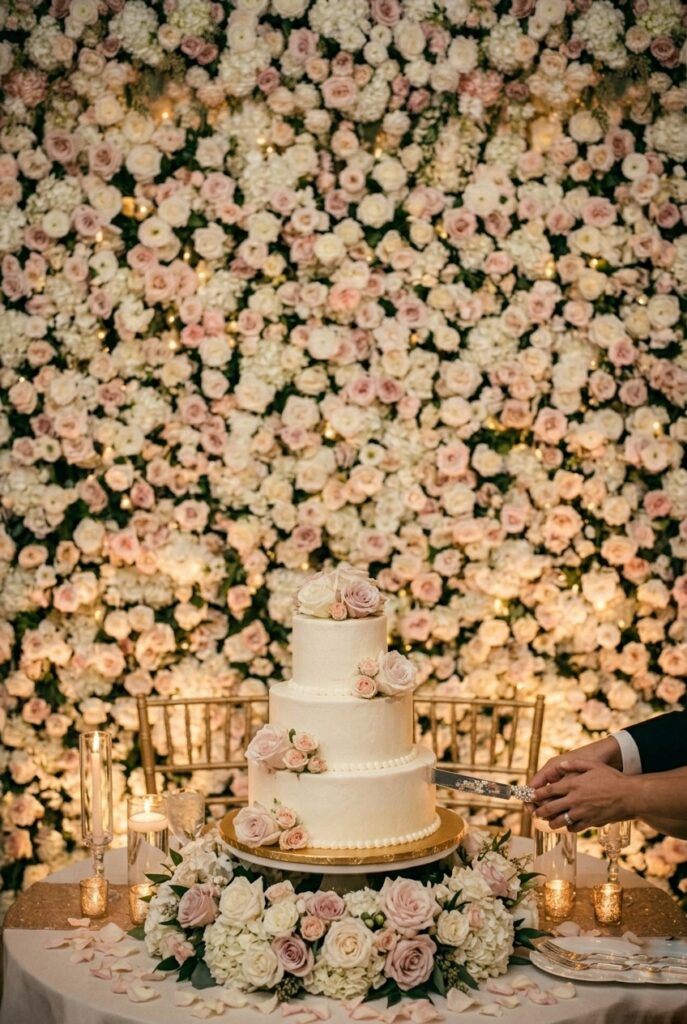
The cake table backdrop is often overlooked but photographs constantly during cake cutting, toasts, and guest photos.
This backdrop can be smaller (6–8 feet wide) and tighter (more detailed florals and embellishments work because the cake is the focus, not a couple).
A simple approach: take the leftover flowers from your ceremony arch or bouquets and arrange them behind the cake table.
Fresh is actually better here because (1) it’s only on display 2–3 hours during cake time, (2) it matches your ceremony florals, (3) fresh flowers never look tired in that short timeframe.
Price range: $100–$300 if you repurpose ceremony flowers; $300–$600 if you commission a separate fresh arrangement.
8. Fresh Flowers for Backdrops (When Quality Matters, Timeline Doesn’t)
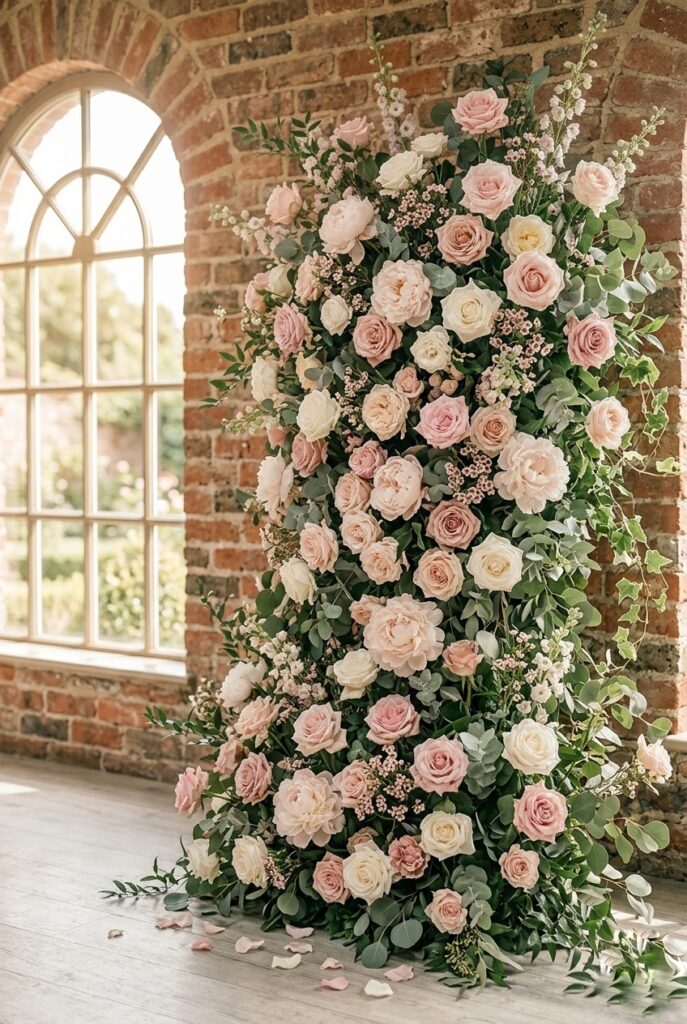
Fresh flowers deliver one irreplaceable thing: they look alive in photos, and they photograph with a luminosity that even premium silk can’t quite replicate. But—and this is critical—they only work if your florist delivers them within six hours of your ceremony and your venue has controlled temperature.
A fresh flower backdrop costs $800–$1,500 through a florist but requires: florist presence during setup (labor charge $200–$400), climate control (not realistic outdoors in summer), and they visibly wilt if your ceremony runs late. Fresh flowers photograph astonishingly in the first two hours. After that, they start looking tired.
Use fresh for: indoor winter/spring ceremonies, venues with AC and immediate photo time, couples who prioritize the first-hour photos above all.
Skip fresh for: outdoor summer weddings, venues with limited cooling, ceremonies later than 2 p.m., couples with extended family photo sessions after the ceremony.
Price range: $800–$1,500 through florist; $300–$600 if you source wholesale flowers yourself and assemble with floral foam (labor-intensive but doable). Where to buy: Local florist, or FiftyFlowers/Whole Blossoms for wholesale sourcing.
Decision Filter
If your head table is against an ugly hotel ballroom wall or awkward venue wall, you need a backdrop—prioritize this.
If your venue has floor-to-ceiling windows or a beautiful view as the backdrop, you might skip the head table backdrop and instead focus on lighting that enhances the view.
If you’re having a sweetheart table and want intimate photos, allocate more of your backdrop budget to detail and florals.
If you’re having a head table with 6+ people and want variety in photos, invest in a larger, simpler backdrop and then create a separate photo area with bold design elements.
If your budget is tight and you must choose, spend on head/sweetheart table backdrop (the couple is the focus and it photographs constantly) and skip the photo area backdrop (guests can take photos against your venue’s existing features or a simple step-and-repeat banner).
The Real Reason
Reception backdrops are priced differently than ceremony backdrops because they’re “easier” technically (less technical arch construction, simpler materials) but more involved logistically (larger scale, longer duration, installation and breakdown happen during your reception day or night).
Vendors price them high because they’re onsite longer and because couples don’t know how to DIY them.
A linen vendor charging $1,200 for a crystal curtain backdrop isn’t charging for the curtains ($324 retail)—they’re charging $876 for the knowledge that oversized drapery needs bracing, lighting, and pleating to look professional.
If you have that knowledge or can gather a small DIY team, you can cut the cost by 60–70% and still have a beautiful result.
If you’re managing a full wedding day and don’t have 2 hours for installation, the vendor markup is fair for the convenience and expertise.
Mistakes to Avoid
Mistake 1: Sizing your backdrop based on what “looks big enough” in photos instead of measuring. I’ve seen couples order a 6-foot backdrop for a 12-foot table because they saw it in a photo and thought it looked fine.
In person, it looks lost and sad. Always measure your table width, multiply by 1.5, and use that as your backdrop width minimum.
A photo is a compressed 2D image—what looks “nice” in a photo is always smaller than what works in 3D space.
Mistake 2: Installing flat against the wall instead of pulling out. A backdrop installed directly against a wall becomes part of the wall visually.
Pull it 12–18 inches out from the wall, position lights behind it, and suddenly it reads as a separate designed element.
This costs zero dollars more in materials and zero dollars in professional installation if you do it yourself.
But it requires knowledge that couples typically don’t have until they see the difference.
Mistake 3: Using the same heavy floral backdrop for ceremony and reception. A ceremony backdrop with dense florals and multiple focal points works for one stationary viewpoint over 30 minutes.
A reception backdrop with the same design fails because (a) guests view it from angles, (b) flowers wilt and look tired, (c) couples want to be the focus, not the backdrop.
If you’re reusing your ceremony backdrop for the reception, add uplighting, simplify the flowers (remove some to create breathing room), and position it further from the wall.
Mistake 4: Trusting a vendor’s pricing without shopping alternatives. One bride paid $1,200 for crystal curtains. Another bride bought the same curtains on Amazon for $324, used Hobby Lobby’s 40% coupon on tulle ($20), and installed with friends for a total cost of $180. Same backdrop.
Radically different price.
Always get three quotes and always ask vendors to itemize (materials vs. labor vs. design fees).
If you have even basic DIY capability, you can cut 50%+ off vendor quotes by shopping materials separately.
FAQ
Can I reuse my ceremony backdrop as my reception head table backdrop?
Yes, but it usually requires modification. Ceremony backdrops often work at ceremony height (10–12 feet tall, focused on an arch).
For reception head tables, you might need to lower the focus, pull it further from the wall, add different lighting, or remove some florals to create sightlines.
If you’re moving it to a different room, check the wall height and space depth—backdrop logistics change completely with new venue dimensions.
What’s the minimum size for a head table backdrop?
10 feet wide minimum for a table that seats 2–4 people. For a longer head table (6+ people), go 12–16 feet wide.
Better oversized than undersized—extra fabric is cheap; reshuffling because you’re undersized is expensive and stressful.
Should my head table backdrop match my ceremony backdrop?
Not necessarily. Many couples have different aesthetics for ceremony vs. reception.
Ceremony is intimate and symbolic. Reception is functional and social.
Your reception backdrop can be simpler, less floral-focused, and more about framing than the ceremony backdrop.
They should coordinate (same color palette, similar style) but don’t need to be identical.
How long before my reception should I install the backdrop?
Minimum: same-day morning, 3–4 hours before guests arrive. Better: the night before, if your venue allows after-hours access.
Never install day-of during your ceremony—you’ll be stressed and rushing.
If you’re installing the morning of, start early, expect it to take 1.5–2 hours, and have a backup plan if something doesn’t fit or attach correctly.
Budget Table
| Backdrop Type | DIY Materials Cost | Vendor Rental Cost | Labor/Install | Total If DIY |
|---|---|---|---|---|
| Simple fabric + lights | $50–$150 | $400–$800 | 1–2 hours | $50–$150 |
| Tulle + fairy lights | $20–$60 | $300–$600 | 30 min–1 hour | $20–$60 |
| Crystal/beaded curtains | $324–$500 | $600–$1,200 | 2–3 hours | $324–$500 |
| Fabric + focal florals | $150–$300 | $700–$1,500 | 2–3 hours | $150–$300 |
| Floral backdrop (dense) | $400–$800 | $1,000–$2,000+ | 3–4 hours | $400–$800 |
| Printed backdrop panel | $200–$400 | $300–$600 | 30 min | $200–$400 |
| Photo booth backdrop | $100–$300 | $300–$600 | 1 hour | $100–$300 |
Reception backdrops are the hidden investment in wedding photos.
More photos happen in front of the head or sweetheart table backdrop than anywhere else in your reception.
Yet couples spend a fraction of the time planning them compared to ceremony backdrops, and then vendors capitalize on that lack of knowledge with 300% markups.
Know your measurements. Understand the actual material costs.
Decide whether DIY installation is realistic for your situation. Then decide whether the vendor convenience is worth the premium, or whether you can source materials yourself and handle a simplified install.
The difference between a basic reception backdrop and an exceptional one isn’t usually the cost—it’s the knowledge of how width, placement, and lighting function differently in a reception space than a ceremony space.