
Most couples spend weeks scrolling backdrop ideas and end up choosing something that looks stunning in photos but falls flat in person.
The backdrops that photograph beautifully in professional wedding blogs often fail in real life because no one tells you the actual physics of an indoor space—ceiling height, sight lines, how light hits fabric, what your guests actually see from their seats.
You end up with a backdrop that’s too small, positioned wrong, or lit badly enough that your photographer has to work around it rather than celebrate it.
Here’s what actually matters when designing an indoor backdrop: not Pinterest aesthetics, but functional elegance that works inside the specific box you’re renting.
This is the distinction between a backdrop that looks like you tried really hard and one that looks like you made a confident choice.
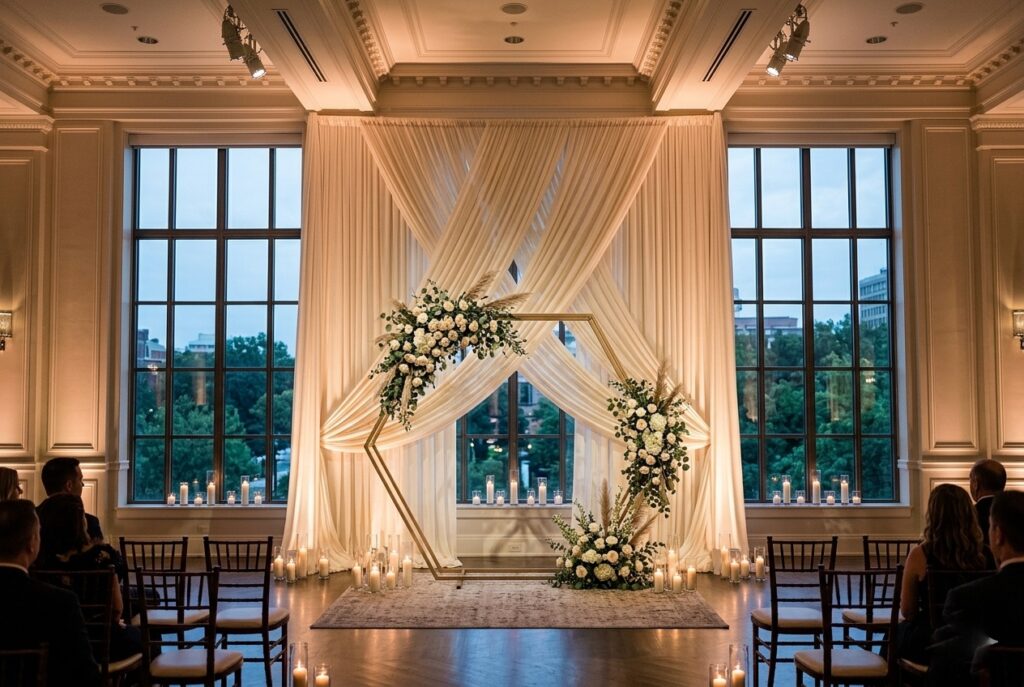
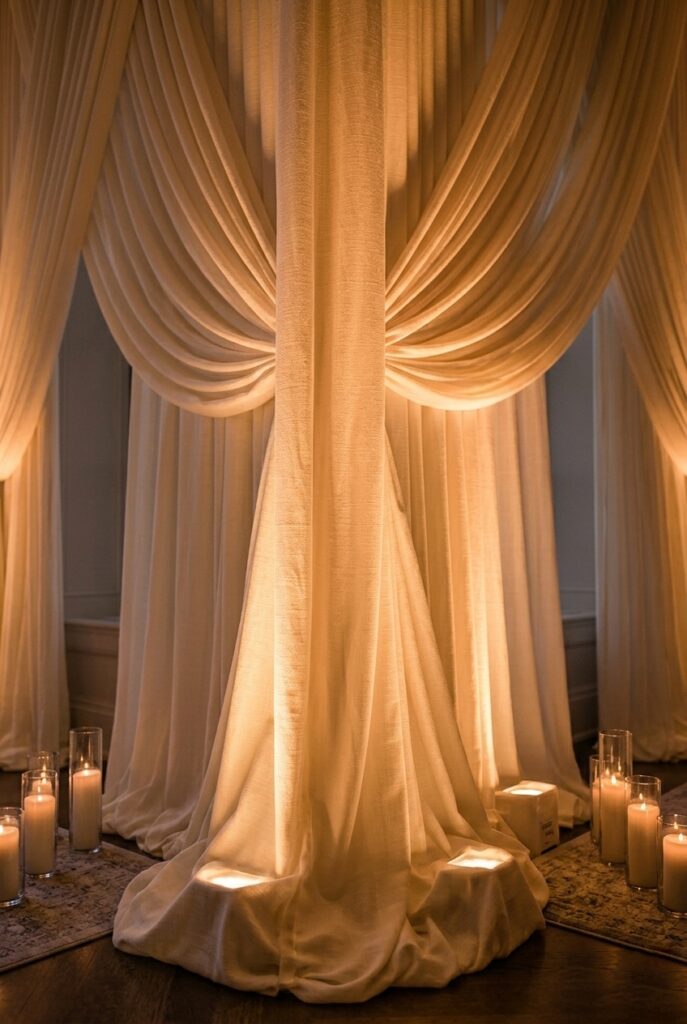
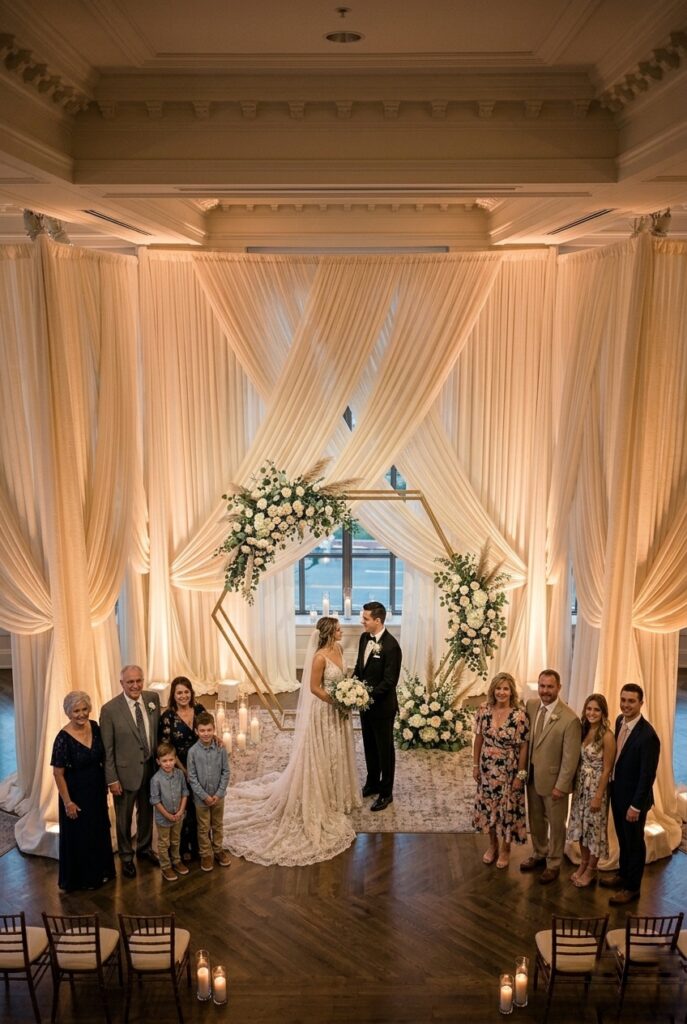
Candlelight flickers soft on linen, the backdrop catching it like skin— not a wall behind you, but a frame that makes you the light instead.
No balloon. No plastic. Just fabric with intention, and shadows that fall because something real is burning.
The Short Answer
Most couples underestimate the relationship between their venue’s ceiling and the scale of their backdrop, then choose decoration before understanding how light actually shapes what guests and photographers see.
A professional-looking indoor backdrop isn’t about more flowers or bigger arches—it’s about proportional scale, strategic lighting that sculpts rather than just illuminates, and materials chosen for how they behave under indoor light rather than how they look in daylight photos.
Start with your venue’s ceiling height and calculate your backdrop dimensions as a percentage of that height, not based on what looked good online.
1. Calculate Your Backdrop Height Against Ceiling Height
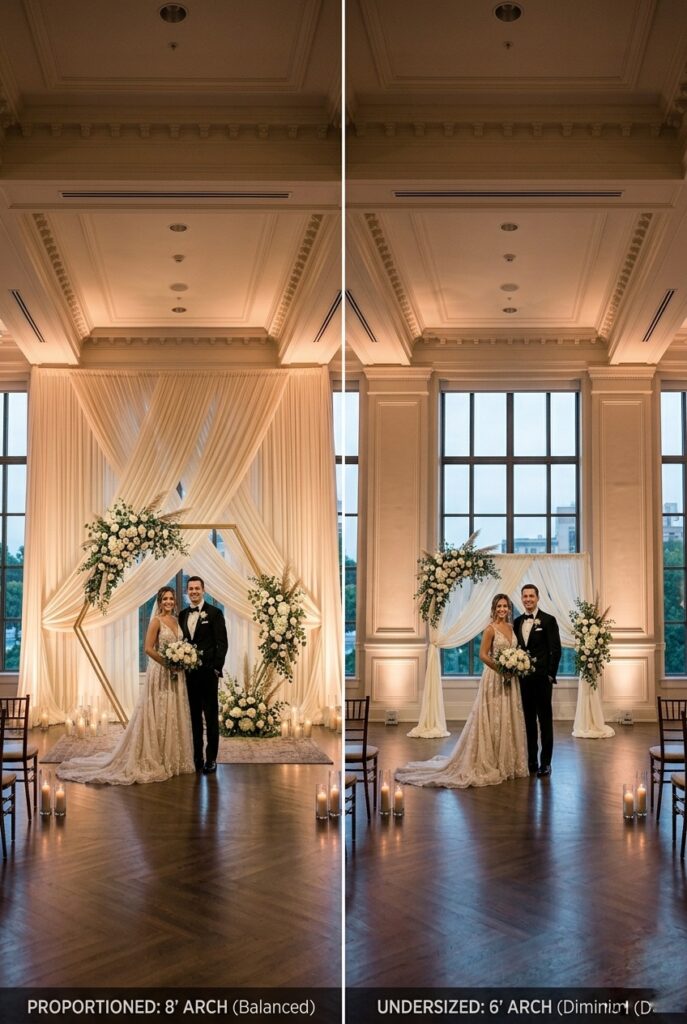
Your ceiling height determines everything about backdrop proportions, and most couples get this completely wrong.
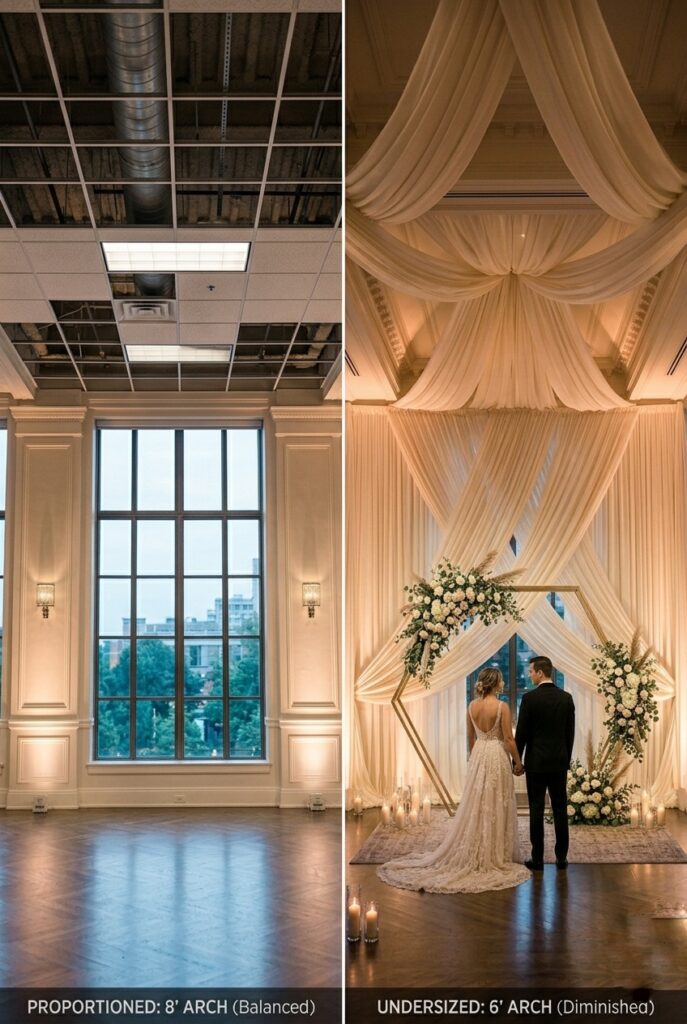
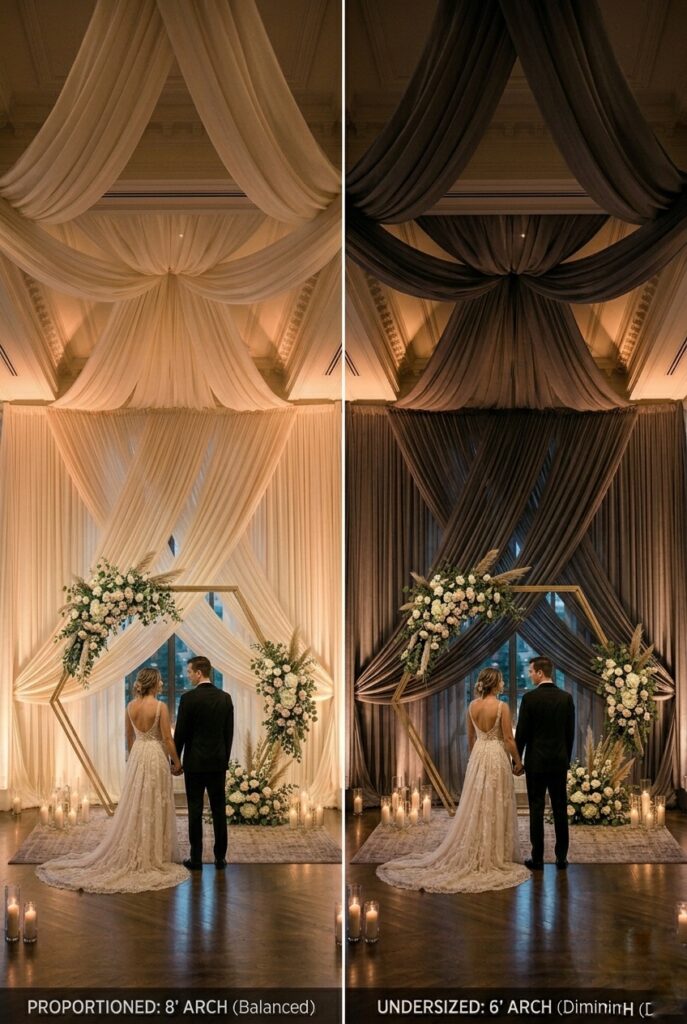
In a standard ballroom with 12-foot ceilings, a 8-foot backdrop looks skimpy and disconnected from the space. In an intimate 10-foot loft, the same 8-foot backdrop dominates and feels cramped.
The professional rule: your backdrop should occupy roughly 60–70% of visible ceiling height, meaning it appears substantial without overwhelming the space.
For a couple exchange: in a 12-foot ballroom, design for 8–10 feet of visible backdrop.
For a 10-foot loft, aim for 6.5–8 feet. For a 14+ foot venue (grand ballroom), you can expand to 10–12 feet without it feeling small.
Get your venue’s exact ceiling height, measure the wall or area where the backdrop will live, and design proportionally.
This single calculation is why luxury weddings look intentional and DIY weddings look makeshift—the scale matches the room.
Price range: Depends on materials chosen next. Budget $150–$500 for DIY frame and fabric setups; $800–$2,500 for professional custom structures built to exact specifications.
Etsy (custom floral arch frames), Amazon (metal frame kits and PVC piping), or wedding rental companies (call three local florists for recommendations).
2. Uplighting Sculpts Your Backdrop; Decoration Just Sits There
Here’s the distinction professionals make that changes everything: decoration (flowers, fabric, arches) creates a picture.
Lighting creates dimension. A backdrop lit only by overhead venue lights looks flat.
A backdrop lit with uplighting from the floor, positioned strategically behind or beside the structure, creates depth, shadow, and visual interest that photographs beautifully and reads as expensive in person.
Uplighting works because it mimics how we naturally see light—from below is rare, so it feels intentional and architectural.
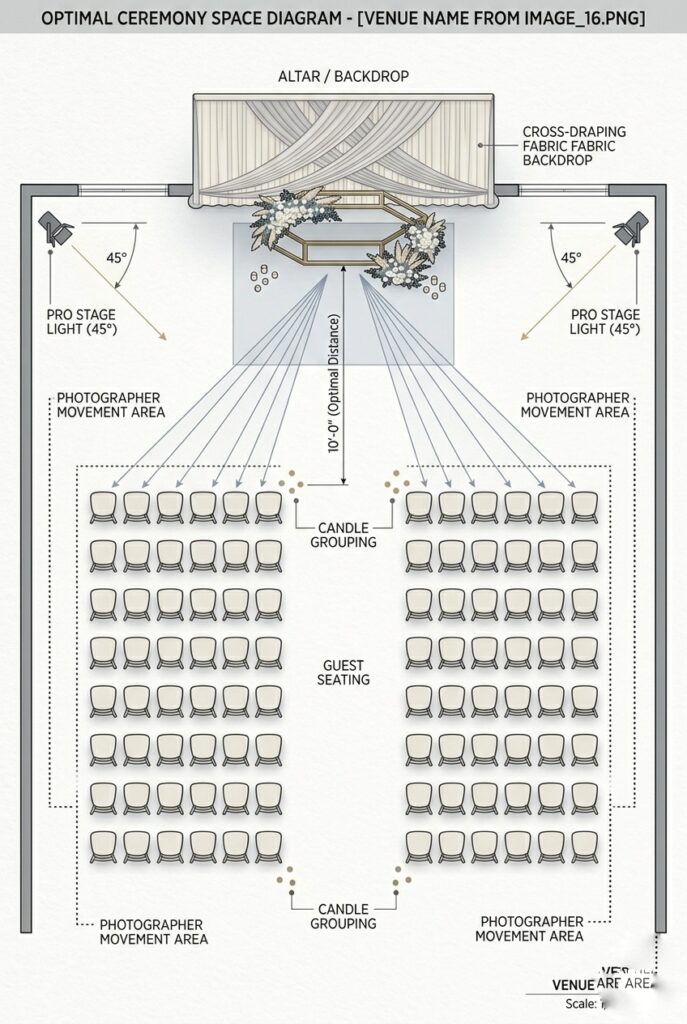
Position two to four uplights (LED or traditional par cans, rented from your lighting company) along the base of the backdrop, angled upward, in warm white (2700K) or a single soft color that complements your flowers.
This creates a “glow” effect that makes even simple fabric read as sophisticated.
Cold white (5000K+) makes everything look harsh and cheap; warm white always wins indoors.
Price range: Uplighting rentals, $75–$200 per light from rental companies; LED uplights on Amazon run $40–$80 per unit and are DIY-friendly if your venue allows you to place equipment.
Expect to rent through your venue’s preferred vendor or WeddingWire (search “uplighting rental” + your city).
3. Fabric Choice Matters More Than Flower Count
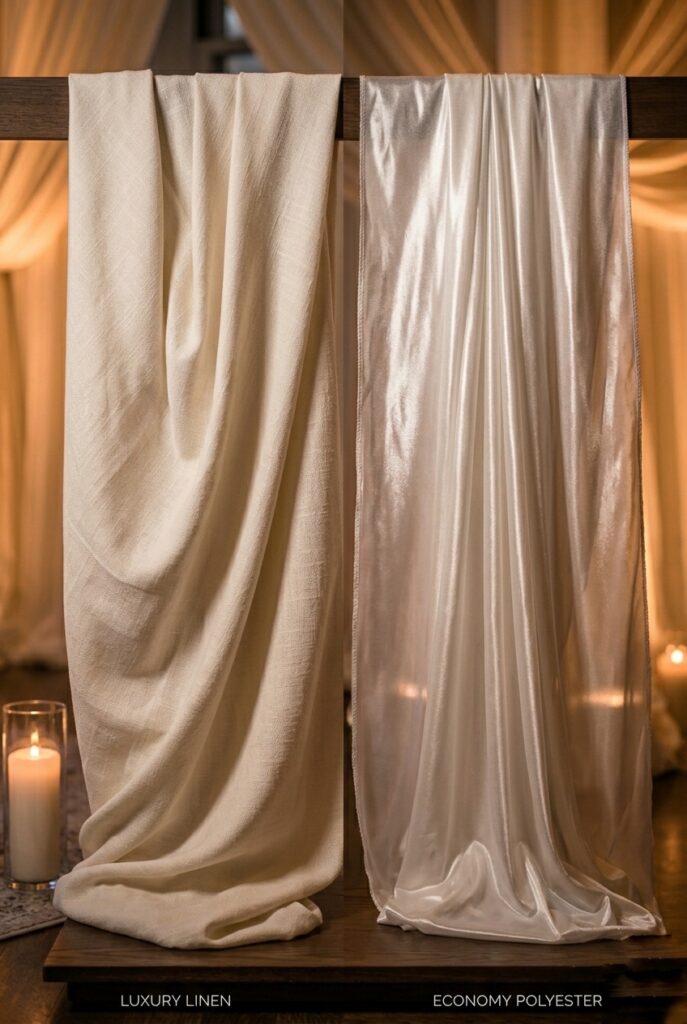
Indoor light behaves differently on different fabrics. Shiny fabrics (satin, silk) reflect light harshly under indoor bulbs and look cheap up close.
Matte fabrics (linen, cotton velvet, raw silk) absorb light and read as intentional and textured.
Sheer fabrics (tulle, chiffon) diffuse light beautifully and work well as layering elements, but they need enough depth and structure behind them or they look like you ran out of money.
The most elegant indoor backdrops use a base layer of matte fabric (ivory or blush linen, $8–$15 per yard from fabric retailers) with sheer layering on top if you want romance.
Skip polyester blends—they wrinkle in humidity and catch light in unflattering ways.
For a DIY approach: buy 30–50 yards of ivory linen from Mood Designer Fabrics or Joann, rent a frame or PVC piping structure, and drape.
For a finished look, hire a local fabric designer or florist to do the draping ($300–$800 for materials and labor).
The difference between matte and shiny is immediate and professional to anyone standing in the room.
Price range: Matte fabrics $200–$600 for material; professional draping adds $400–$1,200.
DIY with thrifted frames and fabric, $200–$400. Joann Fabrics, Mood Designer Fabrics, or local wedding florists.
Skip the polyester “wedding backdrop fabric” packs sold on Amazon—they cheapen the look.
Budget Hack #1: Buy excess fabric from Joann’s end-of-roll sales (50% off regularly) and use it for draping instead of buying “wedding-specific” fabric from specialty retailers. Standard cream or ivory linen works identically and costs $4–$8 per yard instead of $12–$18. You’ll save $200–$400 on material. Source: Call your local Joann store and ask for email alerts on linen sales; buy a week before your wedding. Use PVC pipe or rentable metal frame from a local event rental company ($100–$300 for the structure).
4. Backdrop Width Needs to Accommodate Group Photos, Not Just Couple Portraits
This is the mistake couples make repeatedly: they design a backdrop that looks perfect in engagement photos with just the couple, then on wedding day discover it’s too narrow for family group photos.
Your guests want photos, your photographer wants options, and a 6-foot-wide backdrop that’s gorgeous with two people looks cramped with eight.
Calculate your needed width based on guest count and expected photo scenarios.
If you’re doing group family photos: plan for 12–16 feet of width (allows four to five people standing side-by-side comfortably).
If you’re doing couple portraits and maybe one or two parents: 8–10 feet is sufficient. Position the backdrop so it can extend beyond the width of your arch or frame, using fabric or greenery to fill negative space.
This gives your photographer flexibility to frame tighter for couple portraits or wider for groups without reshooting the background.
A common setup: 10-foot-wide arch or frame in the center, flanked by 4–6 feet of fabric draping on each side, totaling 18–22 feet of visual backdrop.
This looks balanced, frames the couple, and provides space for groups.
Price range: 10-foot metal arch (rentable), $150–$400. Extended fabric draping, $200–$500.
Professional installation by a florist or decorator, $300–$800. Amazon, Etsy, or local event rental companies (search “(your city) wedding arch rental” on WeddingWire or The Knot).
5. Flower Walls Work Indoors Only If They’re Densely Constructed
Flower walls photograph beautifully but often look thin and sparse in person, especially under bright indoor venue lighting. The reason: outdoor light is diffuse and forgiving.
Indoor overhead lights expose every gap.
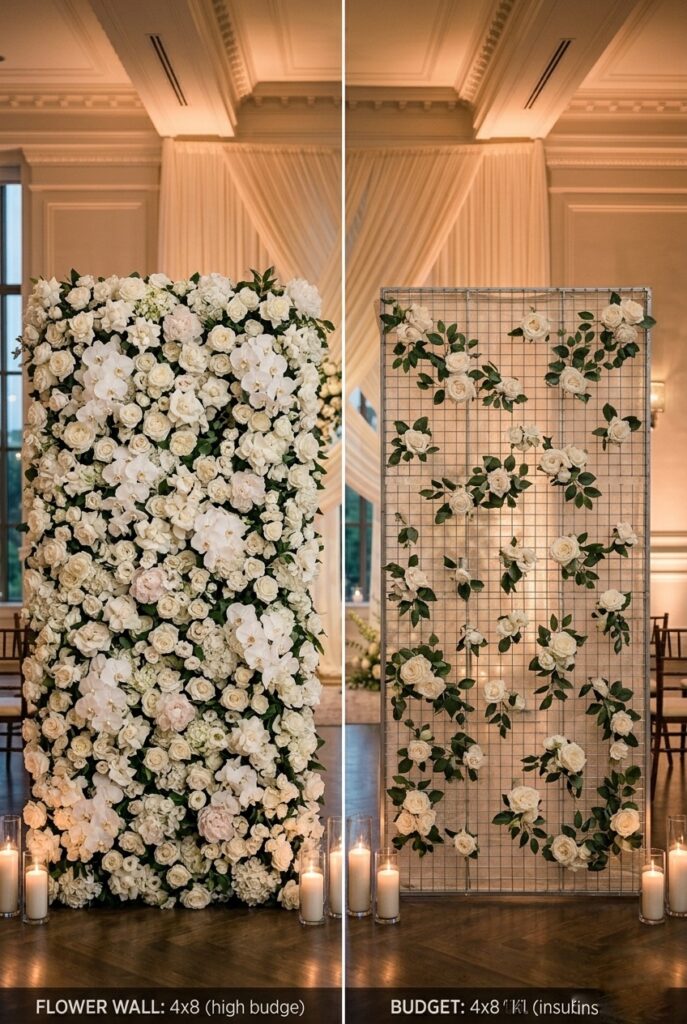
A professional-grade flower wall is densely packed—expect 150–200 flower stems per 4×8-foot panel, not the sparse 40–60 stems found in budget versions. Sparse versions look more like a flower garland than a wall.
If you’re committed to a flower wall indoors, rent or buy a pre-made backdrop panel (4×8 feet, fully constructed, $400–$1,000 from rental companies or Etsy).
Position it as a photo backdrop separate from your ceremony arch, not as your ceremony focal point.
This allows your photographer to use it for post-ceremony portraits without worrying about lighting angles during vows.
Alternatively, use a smaller 4×4-foot flower panel as an accent (costs $200–$500) positioned beside a larger fabric or structural backdrop.
The truth: lush, full flower walls are expensive ($800–$3,000 per panel from florists) and dense enough to look intentional.
Budget-friendly thin flower backdrops read as DIY attempts. If you love flowers but have a small budget, use a floral arch with a fabric or greenery backdrop instead of a full flower wall.
Price range: Pre-made flower wall panels, $400–$1,200 from rental companies (The Knot, WeddingWire).
Custom floral wall from a local florist, $1,200–$3,500 depending on flower type and size. Etsy (smaller pre-made panels), $200–$600.
Budget Hack #2: Rent a fabric backdrop for $150–$300 and add a small rented floral accent piece (4×4 feet, $200–$400) positioned to one side, rather than attempting a full flower wall. This costs $350–$700 total and photographs identically to a $1,500+ full flower wall from certain angles because of how your photographer frames the shot. Source: Call three local rental companies and ask for their smallest pre-made floral panel options. Ask about “photo booth backdrop” packages that include smaller floral accents.
6. Geometric and Metal Arches Photograph Better Than You Expect, Even Without Florals
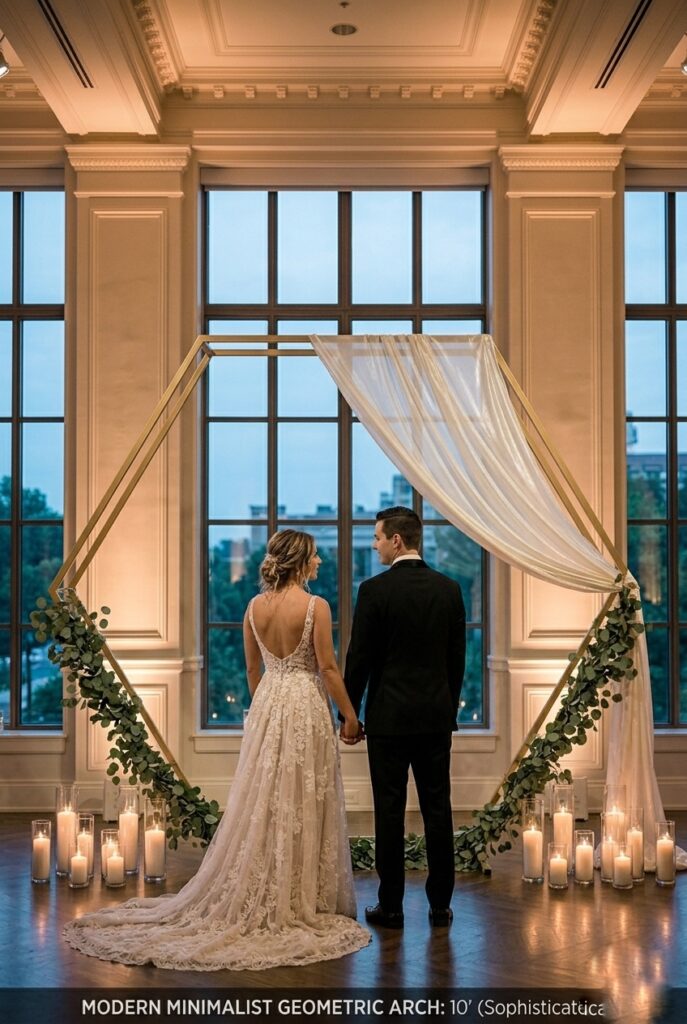
There’s a bias toward floral arches because they’re romantic. But geometric arches (hexagons, circles, triangles) made from metal tubing read as sophisticated and modern in photos, and they cost less to construct and install.
A 10-foot geometric arch in brushed gold or matte black, dressed only with sheer fabric and minimal greenery, looks intentional and editorial.
The advantage: you’re not fighting against sparse florals or wilting flowers under venue lights. Metal reads as intentional regardless of lighting.
A geometric arch + fabric draping + strategic uplighting = professional ambiance for $400–$1,200 total, compared to $1,500–$3,000 for a floral arch with the same impact.
If you want floral element with a geometric arch: drape sheer ivory or blush fabric around the frame, add garland to one or two sides (not all the way around), and let the arch geometry be the star.
This costs $600–$1,500 and photographs better than a fully floral arch because you can actually see the arch structure.
Price range: Metal arch frames, $200–$600 from Amazon or Etsy; professional installation, $100–$300. Fabric + garland accents, $150–$400.
Total DIY, $450–$1,000. Local event rental companies (search “metal wedding arch rental” + your city).
7. Ceiling Draping Finishes the Frame (And Fixes Ugly Ceiling Problems)
Here’s what indoor venue coordinators know: exposed ceiling grids, industrial piping, and acoustic tiles kill elegant wedding aesthetics.
Ceiling draping solves this by creating a fabric canopy that frames the backdrop and hides whatever’s above.
Ivory, blush, or champagne fabric cascades from the ceiling down to the top of your backdrop, creating a finished, intentional look.
The catch: you need at least 12-foot ceilings for ceiling draping to not feel oppressive, and your venue must allow you to rig fabric to the ceiling structure (not all do).
Draping typically requires professional installation ($400–$800 in labor alone) but transforms an ordinary room into a designed space.
If your ceiling is lower or your venue won’t allow rigging: skip ceiling draping and focus on an impactful backdrop frame that draws the eye downward and away from the ceiling.
Dramatic uplighting on your backdrop achieves the same visual effect (makes guests forget about the ceiling) without needing ceiling work.
Price range: Fabric draping material, $200–$400; professional installation, $400–$1,000.
Rental companies (Crystal Event Rentals, local florists, or coordinators) typically handle this.
Check your venue’s contracts for rigging restrictions before committing.
Budget Hack #3: Skip professional ceiling draping installation and instead anchor fabric to your backdrop frame, letting it drape naturally upward and creating the visual effect of ceiling draping without rigging costs. Costs $100–$200 in fabric versus $400–$1,000 in installation labor. Source: Use tulle or lightweight chiffon (not heavy linen) so it drapes without strain. Buy 30–40 yards and attach to the top of your arch frame with zip ties or fabric clamps. The visual effect from photos is nearly identical, and guests standing directly beneath won’t notice.
8. Avoid Dark Neutral Backdrops in Small or Dimly-Lit Venues
Dark backdrops (charcoal, deep gray, black) look editorial in photos but can make your couple look shadowed and indistinct in person under typical indoor lighting.
Dark colors also make your space feel smaller—they absorb light and create visual holes.
In a small ballroom or intimate loft venue with standard overhead lighting, avoid dark backdrops unless you’re planning professional uplighting and additional key lights positioned specifically on the couple.
Neutral doesn’t mean dark. Ivory, blush, champagne, and soft gray read as neutral and sophisticated but reflect enough light to keep your couple visible and the space feeling open.
If you love the drama of darker tones: save it for reception lighting where the whole room is dramatically lit, not just the ceremony backdrop.
Price range: Fabric costs are identical regardless of color ($8–$15 per yard). The difference is in lighting design.
If you choose a dark backdrop, budget an extra $300–$600 for professional uplighting and directional key lights.
9. Positioning Matters More Than Most Couples Expect
Your backdrop’s location in the venue changes everything about how it photographs and how guests experience it.
If positioned too far from where guests are seated, it becomes a distant scenic element rather than a focal point.
If positioned too close (within 4–6 feet of the front row), guests’ sightlines are obstructed and photographers struggle to find clear angles.
The professional standard: position the backdrop 8–12 feet from the front row of guests, allowing clear sightlines for everyone, room for your photographer to move and change angles, and enough depth for the backdrop to appear dimensional rather than flat against your couple.
This also gives you space to add side lighting and uplighting without equipment cluttering the guest view.
For sweetheart table backdrops (reception): position 3–4 feet behind the table, allowing photographers to shoot from behind the couple with the backdrop framing the background, and allowing guests to see the couple without backdrop obstruction.
Price range: This involves venue layout planning, not additional costs, but worth discussing with your coordinator or photographer during site visits. Get their input on positioning before designing your backdrop structure.
10. Backup Plans for Lighting Failures
Indoor venues are dependent on electricity, wiring, and equipment that’s not always reliable.
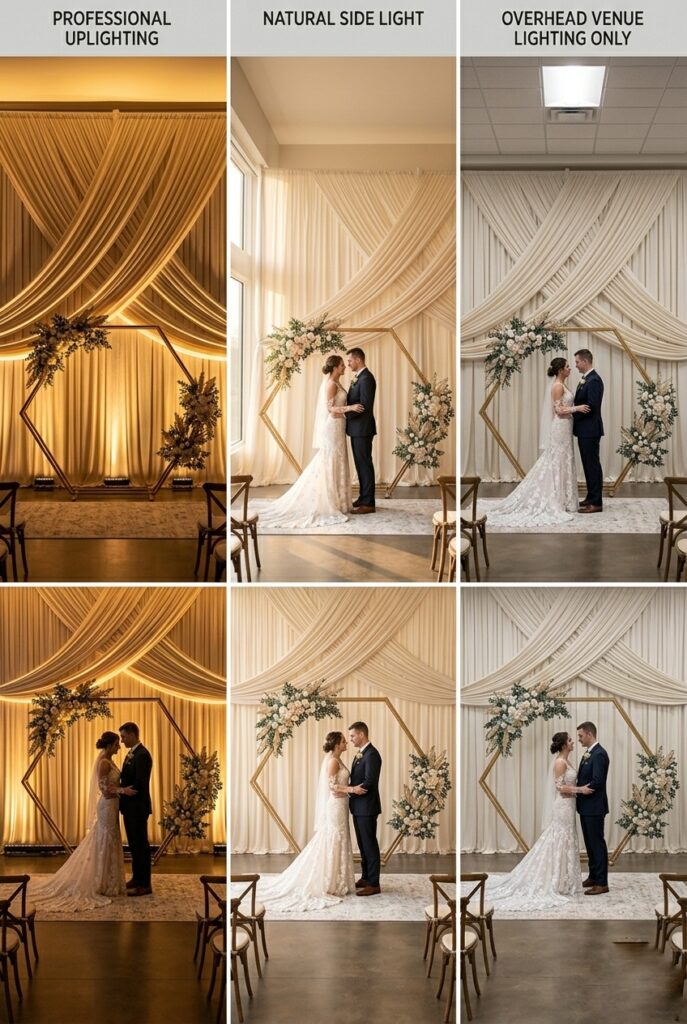
If your uplighting or key lights fail mid-ceremony, your backup is natural window light or a well-positioned backdrop that reads as intentional even under basic overhead lighting.
Design your backdrop to work beautifully under three scenarios: professional uplighting (ideal), natural window light (best fallback), and basic overhead venue lighting (bare minimum).
This means: avoid designs that require specific lighting to look intentional. A fabric backdrop is forgiving.
A heavily floral backdrop that depends on uplighting to hide thin spots will look sparse and rushed if the lights fail.
A geometric arch depends on lighting for dimension—it works, but it’s less forgiving than a substantial fabric foundation.
Have a conversation with your venue coordinator and photographer about lighting backup during initial site visits.
Ask what happens if equipment fails and what your alternatives are.
The couples who handle ceremony disruptions gracefully are the ones who designed for flexibility, not perfection.
Price range: Backup planning is strategic, not a cost. But having your photographer pre-scouted natural light backups saves stress on the day.
Decision Filter
If your guest count is under 75 and your budget is tight, prioritize a well-proportioned geometric arch (metal frame, $300–$600) with fabric draping and strategic uplighting ($200–$400 for rented lights) over a floral backdrop.
This combination photographs beautifully, feels intentional, and costs $500–$1,000 total.
If your venue has a dark, industrial ceiling and you love the look of a simple backdrop, invest in ceiling draping ($400–$1,000 professional install) to create visual containment and elegance.
Without it, even an expensive backdrop fights the room.
If you have high ceilings and a blank white ceiling, skip ceiling draping and invest that budget in a larger, more impressive backdrop structure instead.
If you’re planning extensive family group photos (10+ people), design for at least 16 feet of width.
A too-narrow backdrop forces your photographer to shoot groups at awkward angles, and everyone looks cramped.
Width is cheap compared to hiring extra photographer hours to get make-up shots later.
The Real Reason
Here’s the insider truth photographers and coordinators know but almost never say aloud: most indoor backdrops fail because couples design them like decorations, not like architectural elements that frame the space and reflect light.
You see a pretty flower wall on Instagram and assume buying that exact thing will work.
It won’t, because the Instagram backdrop was shot with professional lighting, from specific angles, at specific times of day—all things you can’t replicate in your venue without understanding the principles underneath.
The couples whose backdrops look expensive and intentional aren’t the ones who bought the most flowers.
They’re the ones who calculated their ceiling height, invested in uplighting, chose fabrics that behave well under indoor light, and positioned the structure so it works with their venue’s architecture, not against it.
They made decisions based on how light moves through a room, not on what looked good in a photo someone else took.
And here’s the thing no one tells you: your photographer already knows which venues photograph well and which ones require backup plans. If you ask them during initial meetings, “What does this room need?” instead of “Do you like this backdrop?” they’ll tell you exactly where to spend money and where you can save it.
They’ve shot 100+ weddings. They know what works and what doesn’t. Listen to them.
Mistakes to Avoid
Mistake 1: Choosing a backdrop size based on ceremony photos without considering group photo width. You love couple portraits, so you design a 6-foot-wide backdrop that’s perfect for two people.
Then wedding day arrives and your photographer needs 12+ feet for family group shots, and now you’re reshuffling the entire layout.
Design width first for group photos. Couple portraits work at any width; group photos need space.
This directly contradicts advice found in competitor articles that prioritize couple framing over group functionality.
Mistake 2: Buying cheap polyester “wedding backdrop fabric” instead of investing in linen, then spending $300 in uplighting trying to make it look expensive. Polyester catches light poorly, wrinkles in humidity, and reads as thin and cheap no matter how much you light it.
You saved $100 on material but spent $300+ trying to compensate.
$200–$400 in quality linen plus basic draping always looks better than $100 in polyester plus extensive lighting.
The math doesn’t work in your favor.
Mistake 3: Designing a gorgeous backdrop and assuming it will photograph beautifully without realizing your photographer’s actual shooting angles and lens choices change everything.
Your backdrop looks perfect from guest perspective but photographs flat because your photographer is shooting at an angle you didn’t anticipate, or the ceiling behind the arch is unflattering, or there’s a door visible on the left side.
You didn’t notice because you were standing in front of it; your photographer noticed immediately.
Walk through your venue with your photographer before finalizing backdrop design.
Ask them to show you sight lines and shooting positions.
What you see standing up is completely different from what they see through a lens.
Mistake 4: Positioning your backdrop so close to the front row that guests in the end seats can’t see the couple clearly. You wanted the backdrop to feel intimate and framing, but you positioned it 4 feet from the front row, and now guests on the aisle can only see the couple from the side, and the whole left section of seating has obstructed views.
The ceremony is about clarity and inclusion, not Instagram aesthetics.
Backup 10+ feet. Your photographer will thank you, and your guests will actually see what’s happening.
FAQ
How wide should my indoor wedding backdrop be?
For couple portraits only, 8–10 feet is sufficient. For groups up to five people, design 12–14 feet wide.
For larger family groups, 16–20 feet allows comfortable positioning without cramping.
Calculate your expected photo scenarios before designing width.
Should I use fresh flowers or faux flowers for an indoor backdrop?
Fresh flowers wilt under indoor heat and venue air conditioning, looking noticeably worse after 2–3 hours.
Faux flowers stay pristine but read as obviously fake under close scrutiny and in photographs.
The professional solution: use fresh flowers if hiring a florist who’ll refresh them hourly, or commit to faux and choose high-quality silk flowers from luxury retailers (not budget craft store versions).
The cheapest-looking option is low-quality faux flowers that nobody believes.
High-quality silk reads as intentional.
What color backdrop works best in low-light venues?
Ivory, champagne, blush, or soft gray all reflect available light and keep your couple visible.
Avoid dark colors unless you’re planning professional key lighting specifically on the couple.
Warm neutrals also complement skin tones better in indoor photography than cool whites or grays.
Can I DIY an indoor backdrop and have it look professional?
Yes, if you start with proper proportions (calculate ceiling height), invest in quality fabric (matte linen, not polyester), add basic uplighting ($150–$400 rentable), and position strategically (8+ feet from guests).
The difference between DIY-that-looks-cheap and DIY-that-looks-intentional is fabric quality, proportional scale, and lighting—not the source of the materials.
Budget Options for Indoor Backdrops
| Option | Cost | What’s Included | Best For |
|---|---|---|---|
| DIY Fabric + Arch | $300–$700 | Fabric, basic metal or PVC frame, no floral accents | Budget-conscious couples comfortable with assembly |
| Rental Fabric Backdrop | $200–$500 | Pre-draped fabric on professional frame, delivery/setup included | Couples wanting polished look without design complexity |
| Geometric Metal Arch + Fabric | $500–$1,200 | Metal arch, fabric draping, basic garland (no flowers), installation | Modern couples wanting intentional minimalism |
| Floral Arch + Fabric | $800–$2,000 | Metal or wood arch, floral arrangement, fabric backdrop, professional setup | Romantic aesthetic lovers with moderate budgets |
| Custom Floral Wall | $1,500–$3,500 | Full densely-constructed flower wall panel, professional setup, backup lighting | Couples prioritizing flowers with no budget limits |
| Professional Full Design | $2,500–$5,000+ | Custom structure, professional draping, ceiling elements, full lighting design | Luxury budgets wanting complete coordination |
The backdrop that photographs best isn’t the one with the most elements.
It’s the one designed for the specific room you’re renting, scaled proportionally, lit to create dimension, and positioned so your guests can actually see what’s happening. Start with ceiling height and guest count, not with flower pictures. Everything else follows from those two numbers.
Read about how to light your ceremony and reception spaces strategically in our guide to wedding lighting design, or explore elegant indoor wedding decor ideas for how backdrop design fits into your full venue aesthetic. If you’re working with a tight budget, our cheap wedding decor ideas and budget wedding decor ideas articles break down where to save without sacrificing intentional design. For couples building their full indoor ceremony and reception look, indoor wedding decor ideas provides the broader picture of how backdrops integrate into coordinated room design. If you’re planning DIY solutions, our DIY wedding decor ideas and easy wedding decor ideas articles walk through execution step by step.