

Most couples who DIY their wedding backdrop fail because they treat it like a decoration project instead of an engineering problem.
You buy materials, assemble something the night before, and hope it stands up.
Then the pipes are wobbly, the fabric sags, or the whole thing tips over when your photographer bumps it.
You end up spending $300 trying to fix it when the original plan would have cost you $150 if you’d just gotten the dimensions right from the start.
A successful DIY backdrop isn’t about being crafty.
It’s about understanding load-bearing weight, pipe diameter, connector stability, and the physics of what keeps a 8-foot-tall structure from collapsing under the weight of fabric, flowers, and humidity.
You can build something gorgeous for $150–$400 that holds up perfectly, or you can build the same structure wrong and regret the entire project.
This is the difference between a DIY win and a DIY disaster.
Plastic pipes hold the weight, but get the diameter wrong and everything bends. There is no Pinterest version of this— only what stands, and what falls down an hour before you say yes.
The Short Answer
Don’t DIY your backdrop if you’re planning anything heavier than plain fabric, if you lack the ability to troubleshoot structural problems, or if you don’t have access to a pipe cutter and basic hardware store tools.
The money you save ($200–$300) isn’t worth the stress of a collapsing structure on your wedding day.
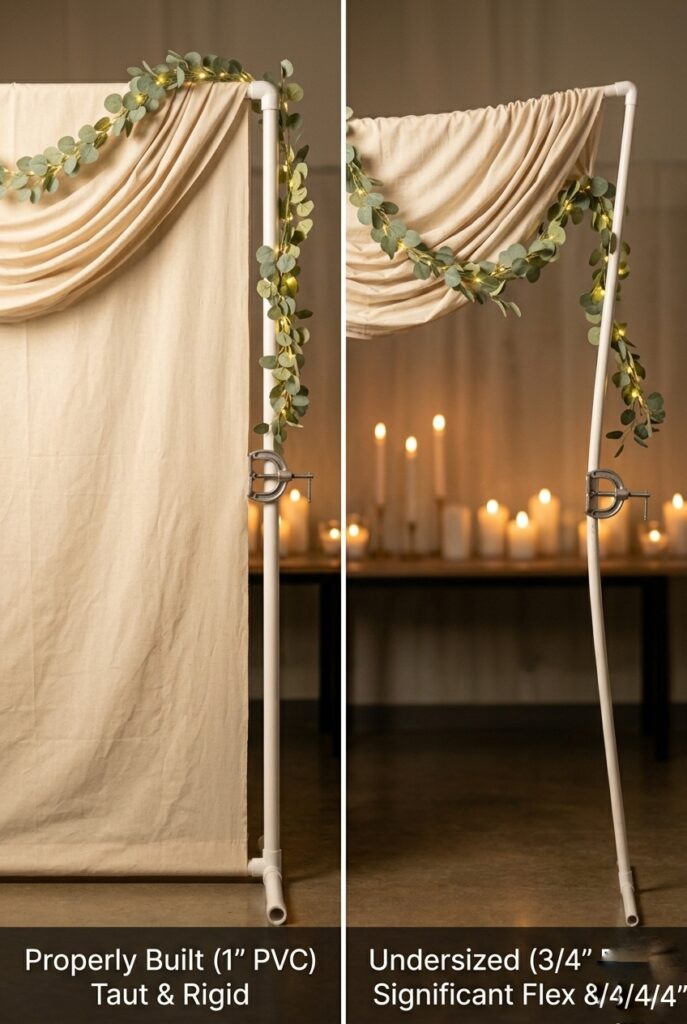
If you do DIY, use 1-inch diameter PVC pipe minimum (3/4-inch is too flimsy), invest in proper connectors (slip-fit, not threaded), and build a base wide enough to support the weight without tipping.
Test your structure three days before the wedding, loaded with the full weight of your planned decorations.
This is non-negotiable.
A solid DIY backdrop is cheaper than renting, but a failed DIY backdrop is the most expensive mistake you can make on wedding day because it costs you guest experience, photos, and peace of mind.
1. Choose Your Material: PVC Pipe vs. Wood vs. Buying a Frame
The core decision is material, and it determines cost, durability, and difficulty. Each has real trade-offs.
PVC pipe ($150–$250 for an 8×7-foot frame): Cheapest option. Lightweight (easy to transport and assemble), requires no advanced tools (pipe cutter available at any hardware store, sometimes free from staff), and breaks down into transportable pieces.
Drawback: it’s weak. 3/4-inch diameter PVC will bend under fabric weight if you build it wrong. 1-inch diameter is standard and holds up fine.
PVC also tops over in wind if not properly weighted.
Requires sandbags or concrete to keep stable outdoors.
You’ll assemble it at home, disassemble it, and reassemble at the venue.
This takes 2 hours total but requires precision—measure twice, assemble once.
Wood (2×4 studs, $250–$400 for an 8×8-foot frame): Mid-range cost. Heavier (requires help transporting), but much more stable. Won’t bend under heavy decorations.
Easier to weight down with stakes or nails.
Requires a handsaw or miter saw (borrow from a friend if you don’t have one).
More forgiving if you make small measurement errors.
Better choice if you’re planning heavy florals or significant decorations.
Pre-made rentable frames ($100–$300 rental): Cheapest option with zero assembly required.
Skip the DIY entirely if you can rent locally.
Check with event rental companies—they often have stand options including backdrop stands that ship with instructions.
This costs less than buying materials and eliminates the risk of structural failure.
Budget decision: If you’re comfortable with basic assembly and have access to tools, PVC + your own fabric/decoration ($150–$300 total) beats renting. If structural integrity makes you nervous or you’re planning heavy elements, buy/rent a pre-made frame ($100–$300) and DIY only the dressing. The backup option saves money and stress.
Price range: PVC materials $150–$250 from Home Depot or Lowe’s. Wood materials $250–$400 from Home Depot.
Rental stands $100–$300 from event rental companies or Wayfair.
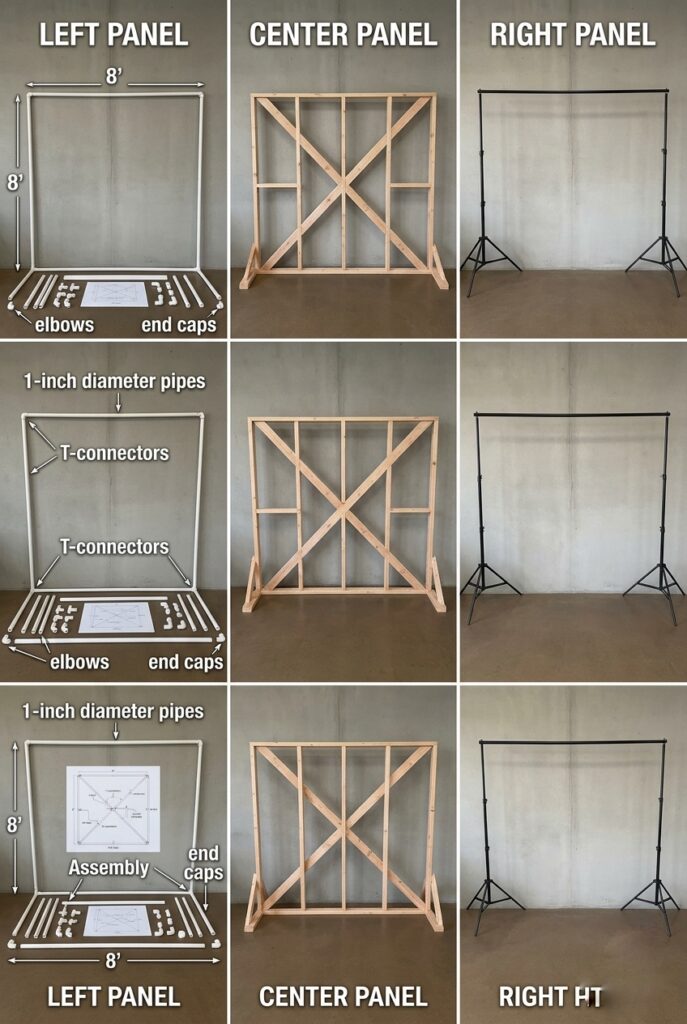
2. The PVC Pipe Build: Exact Measurements and Material List (No Guessing)
If you choose PVC, here’s exactly what you need. No improvisation. Measure twice, buy once.
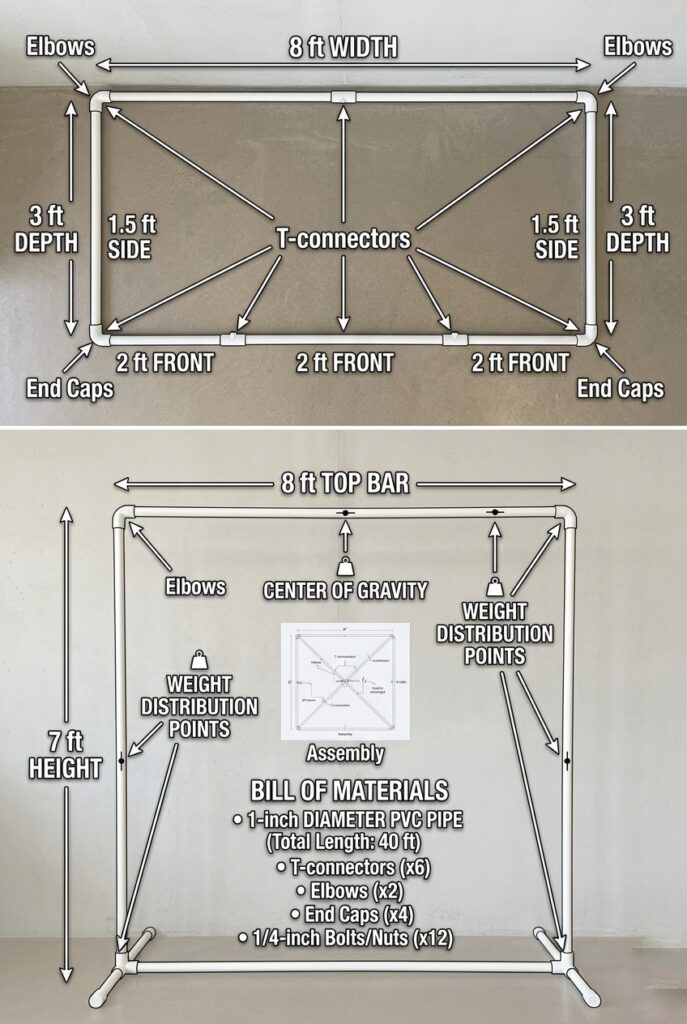
For an 8-foot-wide by 7-foot-tall backdrop (standard size):
- 3 lengths of 10-foot PVC pipe (1-inch diameter, Schedule 40)
- 2 x 90-degree elbows (slip-fit, not threaded)
- 8 x T-connectors (slip-fit)
- 8 x end caps
Cut lengths:
- 2 x 8-foot pieces (top horizontal bar + one middle support)
- 2 x 7-foot pieces (vertical supports)
- 8 x 1.5-foot pieces (base legs for stability)
- 4 x 2-foot pieces (cross bracing for base)
Ask the Home Depot employee to cut these for you at the register—it’s free, and they have the right tools.
Bring a list with exact measurements. This takes 5 minutes and saves you from making measurement errors at home.
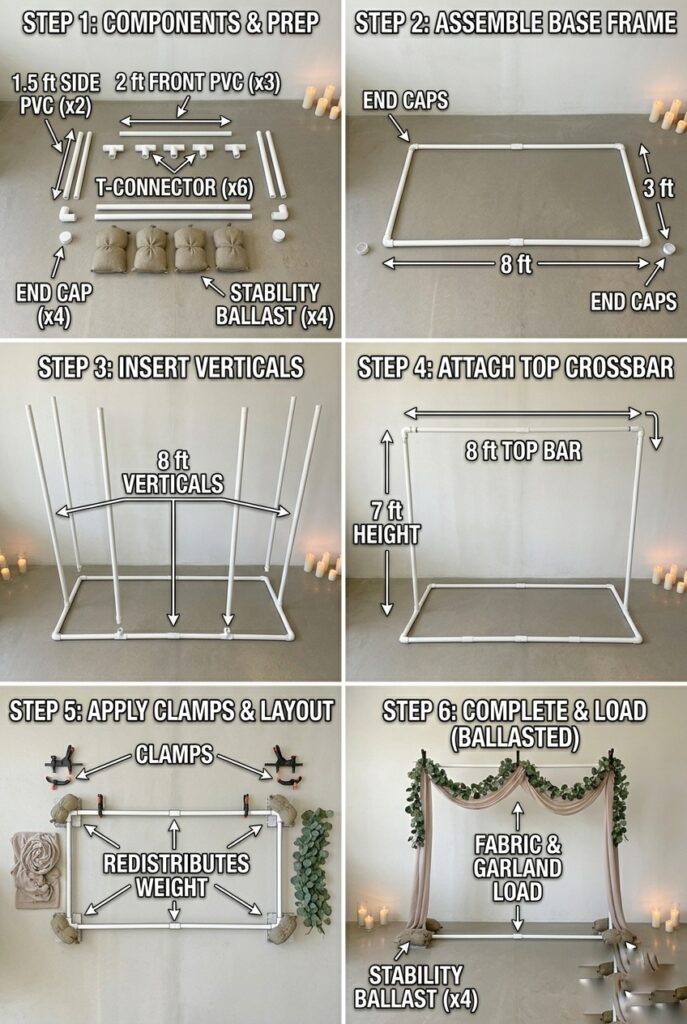
Assembly: Assemble the base first (four 1.5-foot legs connected with 2-foot pieces and T-connectors).
This creates a stable rectangle. Insert the vertical supports into the base Ts.
Connect the horizontal bar at the top using elbows on each vertical side.
Test all connections by pushing each joint—they should have zero give.
Assemble entirely at home, disassemble carefully for transport (mark each piece with tape so you remember which goes where), and reassemble at your venue.
Pro tip for transport: Lay pipes horizontally in your car or truck. Do not stand them vertically.
Vertical transport can cause stress fractures. Wrap with a blanket or towel to protect your vehicle interior.
Pro tip for stability: The base footprint is the most critical element.
Your 8-foot-wide frame needs a base at least 3 feet deep on each side to prevent tipping.
This sounds wide, but it’s the difference between a stable structure and a disaster.
If your venue is small, build narrower (6 feet wide) rather than reducing base depth.
Price range: Materials (all components) $150–$200 from Home Depot. Tools (pipe cutter, tape measure) $0–$30 if you need to buy them (likely borrowed).
3. Fabric: Matte Linen vs. Polyester (and Why One Costs Less and Looks Better)
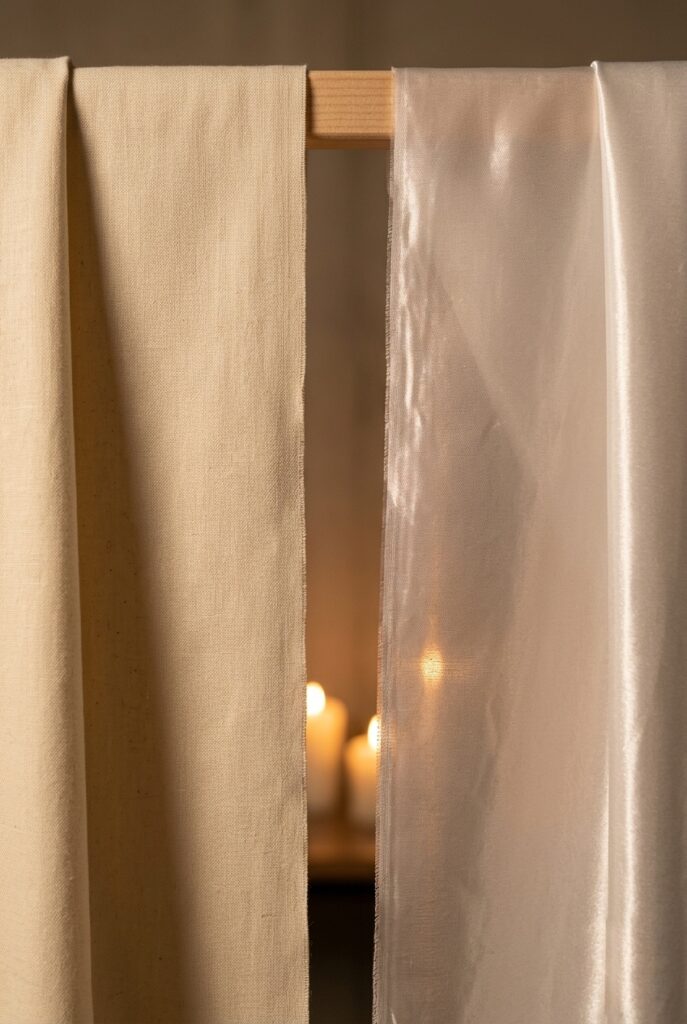
Your backdrop is only as elegant as the fabric you choose. Shiny fabrics (polyester, satin) look cheap under indoor light and wrinkle visibly.
Matte fabrics (linen, cotton) absorb light and read as intentional.
For a DIY budget: skip “wedding backdrop fabric” sold on Etsy and Amazon ($15–$25 per yard, thin and shiny).
Instead, buy standard linen from fabric stores or hardware store drop cloths. A 10×7-foot canvas drop cloth costs $25–$35 at Home Depot, comes in neutral colors, and drapes beautifully.
You can dye it if you want a specific color (costs $5–$10 in fabric dye).
Or buy 50 yards of discount linen from Joann Fabrics ($4–$8 per yard when on sale, which is almost always).
Calculate your fabric needs: width of frame + 12 inches for draping overlap + height + 12 inches. For an 8×7-foot frame, plan for 10 feet wide and 8 feet tall (minimum).
One 10×8-foot piece works, or two 5×8-foot pieces seamed together with double-sided hem tape ($3 for a roll).
The cost difference: Canvas drop cloth ($30) vs. “wedding backdrop fabric” ($300) = $270 savings with identical visual impact. Linen from Joann ($4/yard x 50 yards = $200) vs. wedding markup ($25/yard x 50 yards = $1,250) = $1,050 savings.
Price range: Canvas drop cloth or discount linen, $25–$50 for a full backdrop. Hem tape or clamps for attachment, $5–$10. Skip specialty “wedding fabric.”
Budget Hack #1: Buy a white or cream canvas drop cloth from Home Depot ($25–$35) instead of wedding backdrop fabric ($300+). If you want color, pick up a box of fabric dye ($5) from a craft store and dye it in your bathtub following package instructions. This costs $30–$40 total, produces identical visual results to a $400 fabric backdrop, and you have a usable drop cloth for future projects. Source: Home Depot (search “canvas drop cloth”), Joann Fabrics (end-of-bolt sales), or buy standard linen from fabric.com.
4. Securing Fabric Without Damaging Your Frame
How you attach fabric changes whether your backdrop looks pulled together or thrown together.
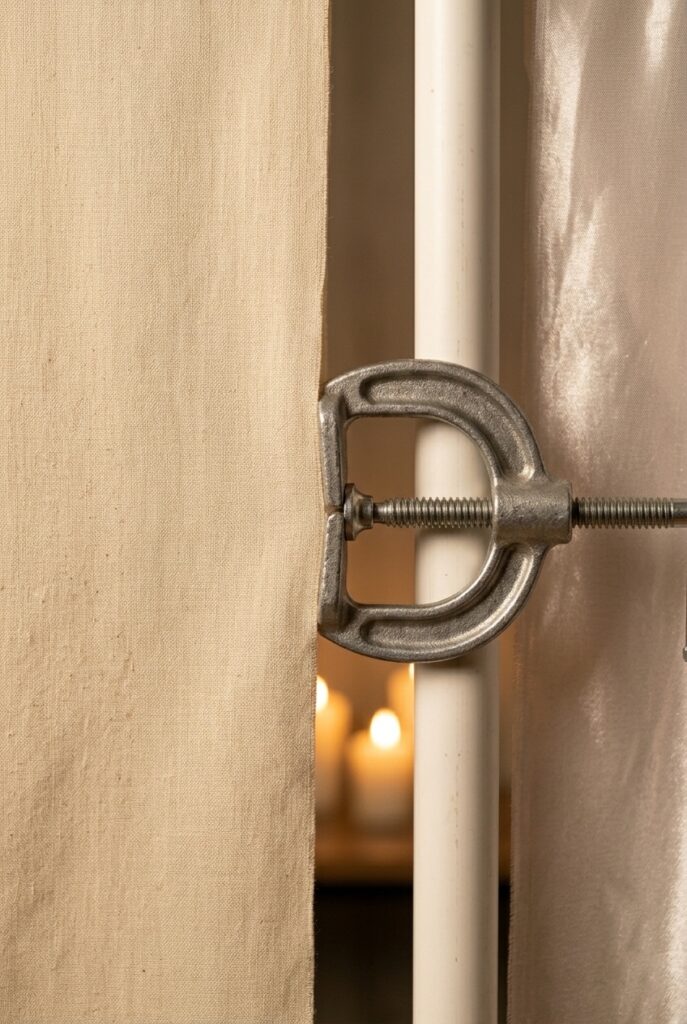
Best method: Heavy-duty clamps ($20–$30 for a set of 4, available at Home Depot).
These lock onto your PVC pipe with a screw tightening mechanism.
Attach clamps to the top horizontal bar, drape fabric through the clamp, and tighten.
The fabric pulls taut and stays secure. Reusable. No damage to fabric or frame.
Okay method: Zip ties ($5 for a pack of 100). Thread zip ties through a fold in the fabric and around the pipe.
Tight, secure, but you have to cut them off after the wedding (they’re single-use).
Less elegant than clamps because you see the tie marks, but it works.
Avoid: Tape, pins, or hot glue. Tape leaves residue and falls off under fabric weight.
Pins rip delicate fabrics. Hot glue damages PVC and fabric permanently.
Price range: Clamps $20–$30 for reusable set. Zip ties $5. Double-sided hem tape for fabric seams $3–$5
5. Weight Limits: Know What Your Frame Can Hold
This is where most DIY backdrops fail.
Couples add flowers, lights, and additional fabric without calculating weight, and the pipes bend or the whole structure tips.
1-inch PVC pipe with proper base can safely hold:
- Plain fabric (negligible weight)
- Garland or lightweight greenery (20–30 pounds, distributed)
- String lights (5–10 pounds)
- Small flower accents (10–20 pounds)
Total safe load with 1-inch PVC + wide base: 50–70 pounds maximum.
Do NOT attempt with DIY PVC:
- Dense flower walls (100+ pounds)
- Heavy velvet fabric + extensive florals (100+ pounds)
- Extensive garland + lights + fabric (80+ pounds)
If you’re planning more than minimal decoration, upgrade to 1.25-inch or 1.5-inch PVC pipe (costs $20–$40 more) or use wood.
Test your fully decorated structure 3 days before the wedding.
Load it with the exact weight of your planned decorations.
If it flexes visibly or feels unstable, you overloaded it. Remove elements or upgrade the frame.
Price range: Upgrading PVC diameter adds $20–$40 to materials cost.
Avoiding structural failure prevents $1,000+ in stress and photographer frustration.
Budget Hack #2: Load-test your frame 72 hours before the wedding using sandbags or water jugs as test weight. Buy two 50-pound sandbags ($20 total) and hang them from the top bar, positioned exactly where your flower accents will hang. Leave them for 24 hours. If the frame flexes or tips, you know you have a problem with 3 days to fix it (upgrade materials, reduce decorations, or rent a professional frame). No surprises on wedding day. Source: Home Depot (sandbags in the contractor section, usually $8–$12 each).
6. Stability in Wind or Crowded Spaces
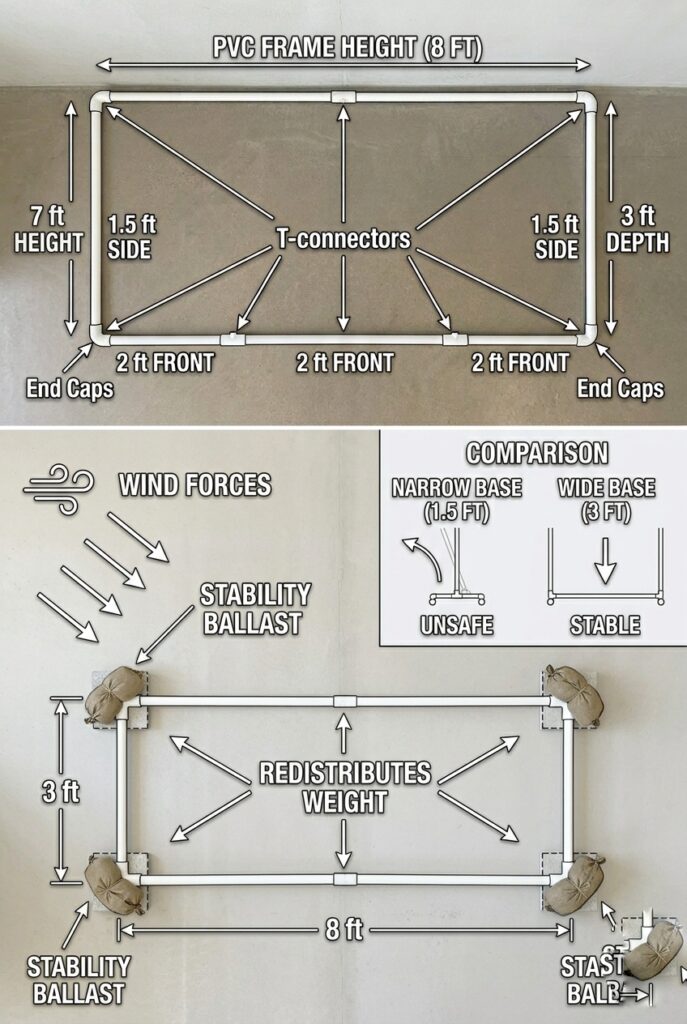
The #1 reason DIY backdrops fail: they tip over because the base is too narrow or there’s no weight holding them down.
For outdoor weddings or venues with foot traffic: Your base needs to be very deep (3+ feet) and heavily weighted.
Use sandbags ($20–$40 for enough to stabilize), concrete footers (mix quick-set concrete into 5-gallon buckets, cost $20–$40), or stake the frame to the ground (drive stakes through holes in base pieces, requires drilling).
For indoor, low-traffic venues: A wide base (3 feet deep) is usually sufficient. No additional weighting needed.
Wind test: If you’re outdoors and there’s any possibility of wind, have two people gently push on the structure from different angles.
It should not move.
If it budges, it’s not stable enough.
Pro tip: Position your backdrop where guest traffic won’t pass directly behind it.
This keeps people from bumping it and making it wobbly during the ceremony.
Price range: Sandbags $20–$40. Concrete and buckets $20–$40. No additional cost if your base is properly proportioned.
7. Assembly Day: Timeline and Troubleshooting
Three days before wedding: Fully assemble your frame at home with all planned decorations loaded.
Test stability, appearance, and fit in your venue space (bring measurements or photos).
Make adjustments.
Two days before wedding: Disassemble carefully. Label each piece with painter’s tape (mark “top bar,” “left vertical,” “base front left,” etc.).
Pack in labeled boxes or a storage container.
Wedding day, 2 hours before ceremony: Arrive at venue early. Lay out all pieces. Assemble in this order: base first, then verticals, then top bar, then elbows and clamps.
Have a second person hold pieces while you tighten connections.
Test before draping fabric.
If something is wobbly, check that all connector joints are fully pushed together (push hard—they should have zero gap).
Attach fabric. Add decorations last.
Troubleshooting common problems:
- Frame is wobbly: Check that all pipes are pushed fully into connectors (they should be flush). If still wobbly, measure the base to ensure it’s symmetrical—uneven measurements cause instability.
- Fabric is wrinkled: Pull taut with clamps before tightening. Wrinkles set in once fabric is clamped, so get it smooth first.
- Structure is leaning: Base is uneven or too narrow. Add wider base legs or weighted sandbags to the leaning side.
- Pipes are cracked or split: Don’t use them. Buy replacements immediately (have backups if possible).
Price range: No additional cost. These are assembly best practices.
8. Decoration: Less is More (and Costs Less Too)
A minimal backdrop decorated thoughtfully reads as more expensive than a heavily decorated backdrop that looks cluttered.
Elegant minimal approach ($200–$350 total cost):
- PVC frame + canvas fabric + clamps: $150–$200
- Simple garland or greenery along top only: $40–$100
- String lights (optional, but inexpensive): $20–$50
- No flowers
This looks polished, photographs beautifully, and costs under $400 total.
Over-decorated approach (DIY failure):
- Same frame and fabric
- Flowers covering every inch: $200–$400
- Heavy garland on all sides: $100–$200
- Lights everywhere: $50–$100
- Total: $500–$900, and it looks busy and amateur
The difference: thoughtful restraint looks professional. Abundance looks desperate.
What to add and what to skip:
- Add: Garland along the top horizontal bar only (visually frames the couple, costs $40–$80 if DIY with greenery from a local florist or craft store)
- Add: Simple string lights if evening ceremony (costs $20–$50, rents from Amazon for $30–$60)
- Skip: Flowers everywhere (expensive, heavy, wilts under lights)
- Skip: Multiple layers of fabric (looks heavy, difficult to keep taut)
Price range: Minimal decoration $200–$350 total. Flowers or excess decoration adds $200–$500 without improving appearance proportionally.
Budget Hack #3: Buy grocery store flowers (roses, carnations, eucalyptus, $30–$50 for a bunch) and arrange them in clear glass vases placed on the ground in front of your backdrop, rather than trying to attach flowers to the frame itself. This costs $30–$50, looks intentional, and photographically frames your couple better than flowers scattered on the structure itself. You can move the vases, adjust them for photos, and reuse them for reception. Source: Trader Joe’s, Safeway, or Whole Foods (buy one day before wedding).
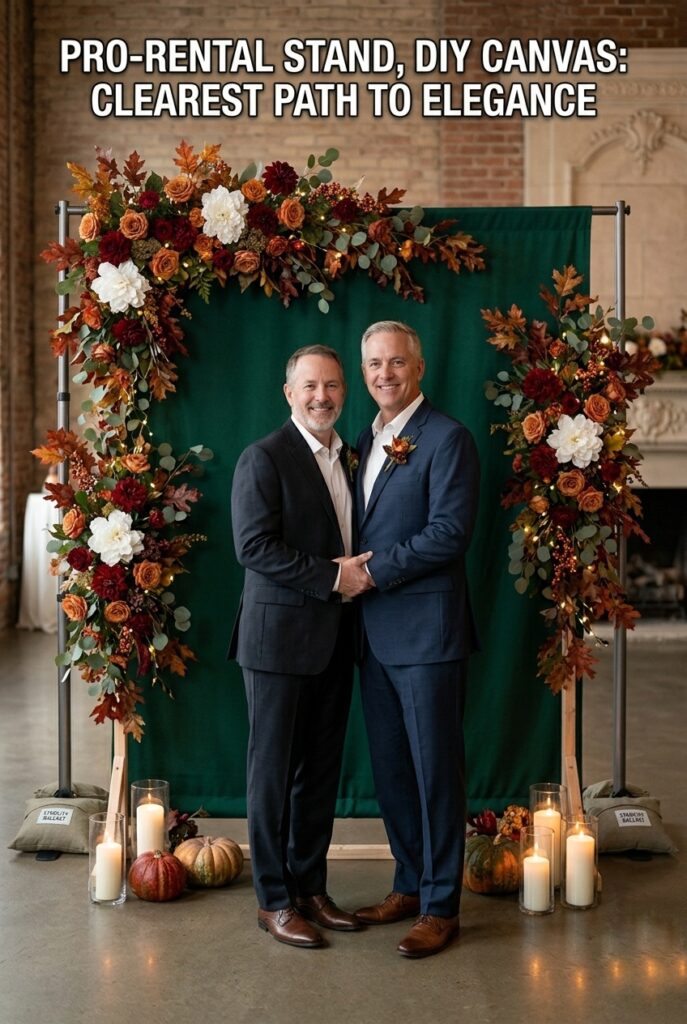
9. The Smart Alternative: Rent a Stand, DIY the Decoration
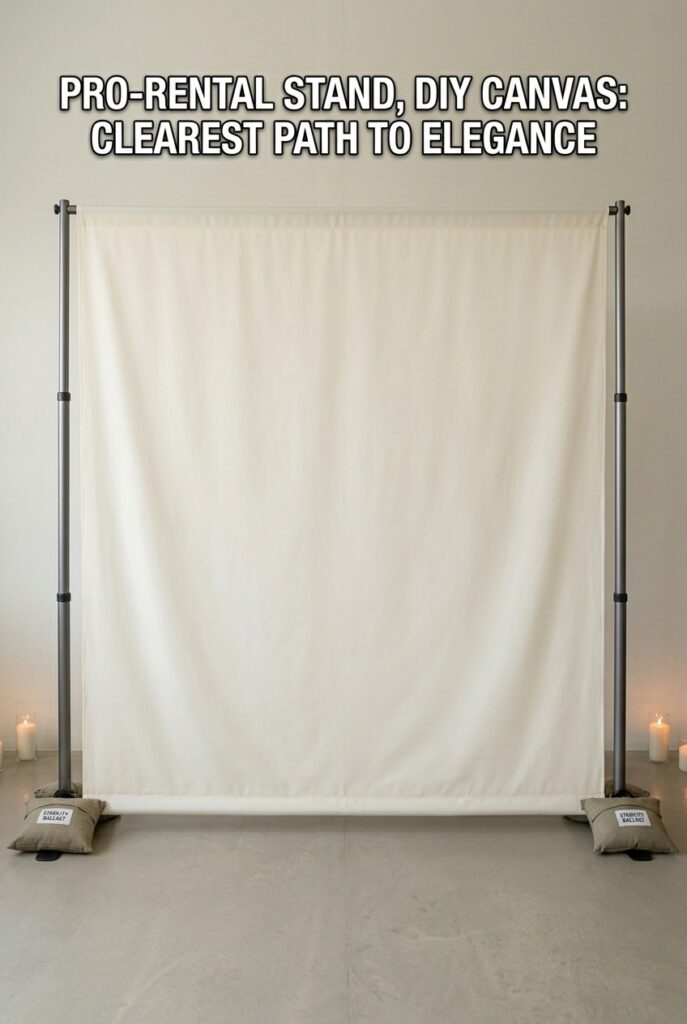
Here’s the reality: if you’re not confident in your building skills, renting a backdrop stand for $100–$250 and spending your DIY effort on fabric and decoration is smarter than trying to build the frame yourself and failing.
Event rental companies rent basic backdrop stands (8×8-foot, collapsible, come with instructions) for $75–$200 depending on your area.
Add your own fabric, garland, and lights, and you have a finished backdrop that cost $150–$350 total with zero structural risk.
This is the move if:
- You lack tools or hardware experience
- You’re unsure about measurements
- You want zero possibility of structural failure
- Your time is more valuable than the $100–$150 you’d save building it yourself
Call three local event rental companies (search “[your city] wedding backdrop rental” on The Knot or WeddingWire) and ask about basic stand rentals.
Most have them. Delivery and pickup usually included.
Price range: Rental stand $75–$200. Add your own fabric and decoration ($100–$250), total $175–$450.
Only slightly more than DIYing the frame, with significantly less risk.
10. Post-Wedding: Reusing Your Backdrop (Save Money Next Time)
If you build or rent a backdrop, you can reuse it for anniversary photos, future celebrations, or sell it to another couple.
Built it yourself? You now own a reusable frame. Store it disassembled, labeled, in a weatherproof container.
Use it for family photos, elopements, engagement sessions, or baby showers. The investment pays for itself if you use it twice.
Rented it? Take photos of the setup. Document what worked. Use it again if you host events.
Some rental companies offer “bride-to-bride” discounts if you refer other couples.
A couple we know built a PVC backdrop for their ceremony, used it for their first-anniversary photo shoot, and sold the frame to another couple for $100.
Total cost after resale: $50. Not bad.
Price range: Free if you reuse your own.
Potential resale value $50–$150 if selling to another couple.
Decision Filter
If you have basic DIY confidence and access to tools, building a PVC backdrop costs $150–$250 and saves $200–$300 versus renting. Do it.
If you lack tools, have never cut PVC before, or are nervous about structural integrity, rent a stand for $100–$200 and DIY the decoration.
The peace of mind and zero risk of failure is worth the extra $100.
If you’re planning minimal decoration (just fabric and maybe garland), DIY is worth it.
If you’re planning flowers, heavy fabric, and lights, rent a professional frame—the load-bearing risk isn’t worth the savings.
If your wedding is at an unusual venue (your backyard, a field, an uneven floor), budget for stability equipment (sandbags, concrete, stakes).
Don’t just assume your base will be stable. Test it.
The Real Reason
Here’s what photographers and florists know that couples don’t: the success of your backdrop depends almost entirely on three hidden decisions that nobody sees.
First is base depth—guests never think about your base, but if it’s too narrow, the structure leans or wobbles, and your photographer has to work around it all day.
Second is pipe diameter—the choice between 3/4-inch and 1-inch PVC pipe costs $20 but determines whether your frame bends under decoration weight or stays rigid.
Third is whether you actually tested the structure before wedding day—couples who assemble their frame weeks early, fully decorated, discover problems with time to fix them.
Couples who assemble the night before discover problems too late.
The couples whose DIY backdrops look professional aren’t craftier than the ones who fail.
They just made the structural decisions invisible to guests—deep base, proper pipe diameter, and a test run three days before.
They didn’t cut corners on the things guests don’t see, and that’s why the final product reads as intentional instead of improvised.
Mistakes to Avoid
Mistake 1: Buying 3/4-inch PVC because it’s cheaper than 1-inch, then discovering mid-assembly that it bends under your planned decoration weight. You saved $20 on materials but now either have to remove decorations (disappointing) or buy new pipes immediately (defeating the savings).
1-inch diameter PVC is the minimum diameter for any wedding backdrop. Non-negotiable.
This directly contradicts budget advice found in competitor articles that prioritize cost savings over function.
Mistake 2: Assembling your frame the night before the wedding, fully decorated, with no time to troubleshoot if something is wobbly or unstable. You discover at 5 PM the day before your 4 PM ceremony that the frame leans.
Now you’re frantically adjusting the base or buying new materials with zero time to test them.
Assemble and test 72 hours before. Not 24 hours. Not the morning of. Three full days.
Mistake 3: Skipping the base entirely or making it too narrow, assuming the frame’s weight alone will keep it stable. Your 8-foot frame with a 1-foot base will tip in a stiff breeze or if a guest leans against it during photos.
You spend the entire ceremony worried about stability instead of enjoying the day.
Build a 3-foot-deep base.
It’s not negotiable, and it’s not that much more material.
Mistake 4: Overestimating your DIY ability or your timeline. You think you’ll assemble the frame yourself the morning of the wedding, but you underestimate how long it takes (usually 2+ hours with two people), and now you’re stressed and unprepared.
Either build it in advance, or hire two friends to help with paid pizza and drinks.
Budget 3 hours for assembly with help, 5 hours alone. Plan accordingly.
FAQ
How long does it take to build a PVC backdrop frame?
With two people and clear instructions, 1–2 hours for initial assembly.
Add 30 minutes for disassembly and labeling for transport. Reassembly at the venue takes 45 minutes to 1 hour.
Plan 3 hours total on wedding day including setup and decoration.
Can I use wood instead of PVC pipe?
Yes. Wood (2×4 studs) is heavier, more stable, and better for heavy decorations, but requires more tools (handsaw or miter saw) and is slightly more expensive ($250–$400 versus $150–$250 for PVC).
Wood doesn’t require weighting or sandbags because it’s inherently more stable.
Choose wood if you’re planning flowers or heavy elements.
What’s the easiest decoration for a DIY backdrop?
Fabric alone, with optional garland along the top.
String lights add cost ($20–$50) but are easy to attach and visually impact the final look significantly.
Fresh flowers from a grocery store, arranged in vases positioned in front (not attached to the frame), cost $30–$50 and look intentional without the difficulty of securing flowers to PVC pipe.
Should I hire someone to build my backdrop if I’m not confident?
Yes. Hire a handy friend, local carpenter, or contractor to build it ($150–$300 in labor).
Add materials cost ($150–$250), and you’re at $300–$550 total—still cheaper than renting a professional backdrop ($1,500+) or a rental stand plus decoration ($400–$600) if your vision requires complex structure.
It’s money well spent for peace of mind.
Budget Options for DIY Backdrops
| Option | Cost | Effort Level | Risk | Best For |
|---|---|---|---|---|
| Rent Backdrop Stand + DIY Decoration | $150–$350 | Low | Minimal | Zero confidence in DIY, limited time |
| DIY PVC Pipe Frame + Fabric | $150–$300 | Medium | Moderate | Confident DIYers, minimal decoration |
| DIY Wood Frame + Fabric | $250–$400 | Medium-High | Low | Heavy decorations, outdoor weddings |
| DIY PVC + Garland + Lights | $200–$400 | Medium | Moderate | Balanced look, some decoration |
| Professional Installation of Rented Frame | $400–$800 | None | Minimal | Complex design, no time, peace of mind |
The difference between a DIY backdrop that works and one that fails is the stuff people don’t see: base proportions, pipe diameter, and testing before the big day.
You can’t wing it.
Get your measurements exact, use proper materials, and test your structure fully assembled three days before the wedding.
Everything else is decoration, and decoration is easy.
Structure is the hard part, and that’s where you either succeed or fail.
If you decide renting is better for your situation, read our easy wedding decor ideas for how to decorate a rented backdrop beautifully on a budget.
For couples planning broader indoor decor, our indoor wedding decor ideas article covers how your backdrop integrates into the full room design.
Looking for even cheaper decoration overall?
Cheap wedding decor ideas and budget wedding decor ideas break down where money actually matters versus where you can cut without sacrificing appearance.
If you’re building other DIY elements, our DIY wedding decor ideas article covers the full landscape of what’s worth making yourself and what’s not.